
Hey guys,
In this post I would like to show you how to generate a script to export all database indexes, very useful for migrations and configuration of new environments.
How to generate a script with all database indexes using T-SQL
One of the quickest and most practical ways is to use the script below, which will generate a select with all the indexes that exist in the base.
/*****************************************************************************
MIT License, http://www.opensource.org/licenses/mit-license.php
Contact: [email protected]
Copyright (c) 2018 SQL Workbooks LLC
Permission is hereby granted, free of charge, to any person
obtaining a copy of this software and associated documentation
files (the "Software"), to deal in the Software without
restriction, including without limitation the rights to use,
copy, modify, merge, publish, distribute, sublicense, and/or
sell copies of the Software, and to permit persons to whom
the Software is furnished to do so, subject to the following
conditions:
The above copyright notice and this permission notice shall be
included in all copies or substantial portions of the Software.
THE SOFTWARE IS PROVIDED "AS IS", WITHOUT WARRANTY OF ANY KIND,
EXPRESS OR IMPLIED, INCLUDING BUT NOT LIMITED TO THE WARRANTIES
OF MERCHANTABILITY, FITNESS FOR A PARTICULAR PURPOSE AND
NONINFRINGEMENT. IN NO EVENT SHALL THE AUTHORS OR COPYRIGHT
HOLDERS BE LIABLE FOR ANY CLAIM, DAMAGES OR OTHER LIABILITY,
WHETHER IN AN ACTION OF CONTRACT, TORT OR OTHERWISE, ARISING
FROM, OUT OF OR IN CONNECTION WITH THE SOFTWARE OR THE USE OR
OTHER DEALINGS IN THE SOFTWARE.

https://gist.github.com/LitKnd

*****************************************************************************/

SELECT
    DB_NAME() AS [database_name],
    sc.[name] + N'.' + t.[name] AS table_name,
    si.index_id,
    si.[name] AS index_name,
    si.[type_desc],
    (SELECT MAX([value].[user_reads])
        FROM (VALUES (last_user_seek), (last_user_scan), (last_user_lookup)) AS value(user_reads)) AS last_user_read,
    [stat].[last_user_update],
    CASE si.index_id WHEN 0 THEN N'/* No create statement (Heap) */'
    ELSE
        CASE [si].[is_primary_key] WHEN 1 THEN
            N'ALTER TABLE ' + QUOTENAME(sc.name) + N'.' + QUOTENAME(t.name) + N' ADD CONSTRAINT ' + QUOTENAME(si.name) + N' PRIMARY KEY ' +
                CASE WHEN si.index_id > 1 THEN N'NON' ELSE N'' END + N'CLUSTERED '
            ELSE N'CREATE ' +
                CASE WHEN [si].[is_unique] = 1 then N'UNIQUE ' ELSE N'' END +
                CASE WHEN si.index_id > 1 THEN N'NON' ELSE N'' END + N'CLUSTERED ' + (CASE WHEN si.[type] IN (4, 5) THEN 'COLUMNSTORE ' ELSE '' END) +
                N'INDEX ' + QUOTENAME(si.name) + N' ON ' + QUOTENAME(sc.name) + N'.' + QUOTENAME(t.name) + N' '
        END +
        /* key def */ (CASE WHEN si.[type] IN (0, 1, 2) THEN N'(' + [keys].[key_definition] + N')' ELSE '' END) +
        /* includes */ (CASE WHEN si.[type] IN (0, 1, 2) THEN CASE WHEN [includes].[include_definition] IS NOT NULL THEN
            N' INCLUDE (' + [includes].[include_definition] + N')'
            ELSE N''
        END ELSE '' END) +
        /* filters */ CASE WHEN [si].[filter_definition] IS NOT NULL THEN
            N' WHERE ' + [si].[filter_definition] ELSE N''
        END +
        /* with clause - compression goes here */
        CASE WHEN [row_compression_clause].[row_compression_partition_list] IS NOT NULL OR [page_compression_clause].[page_compression_partition_list] IS NOT NULL
            THEN N' WITH (' +
                CASE WHEN [row_compression_clause].[row_compression_partition_list] IS NOT NULL THEN
                    N'DATA_COMPRESSION = ROW ' + CASE WHEN psc.name IS NULL THEN N'' ELSE + N' ON PARTITIONS (' + [row_compression_clause].[row_compression_partition_list] + N')' END
                ELSE N'' END +
                CASE WHEN [row_compression_clause].[row_compression_partition_list] IS NOT NULL AND [page_compression_clause].[page_compression_partition_list] IS NOT NULL THEN N', ' ELSE N'' END +
                CASE WHEN [page_compression_clause].[page_compression_partition_list] IS NOT NULL THEN
                    N'DATA_COMPRESSION = PAGE ' + CASE WHEN psc.name IS NULL THEN N'' ELSE + N' ON PARTITIONS (' + [page_compression_clause].[page_compression_partition_list] + N')' END
                ELSE N'' END
            + N')'
            ELSE N''
        END +
        /* ON where? filegroup? partition scheme? */
        ' ON ' + CASE WHEN psc.name is null
            THEN ISNULL(QUOTENAME(fg.name),N'')
            ELSE psc.name + N' (' + [partitioning_column].[column_name] + N')'
            END
        + N';'
    END AS index_create_statement,
    [partition_sums].[reserved_in_row_GB],
    [partition_sums].[reserved_LOB_GB],
    [partition_sums].[row_count],
    [stat].[user_seeks],
    [stat].[user_scans],
    [stat].[user_lookups],
    [stat].[user_updates] AS queries_that_modified,
    [partition_sums].[partition_count],
    [si].[allow_page_locks],
    [si].[allow_row_locks],
    [si].[is_hypothetical],
    [si].[has_filter],
    [si].[fill_factor],
    [si].[is_unique],
    ISNULL(pf.name, '/* Not partitioned */') AS partition_function,
    ISNULL(psc.name, fg.name) AS partition_scheme_or_filegroup,
    t.create_date AS table_created_date,
    t.modify_date AS table_modify_date
FROM
    sys.indexes AS si
    JOIN sys.tables AS t ON si.[object_id] = t.[object_id]
    JOIN sys.schemas AS sc ON t.[schema_id] = sc.[schema_id]
    LEFT JOIN sys.dm_db_index_usage_stats AS stat ON [stat].[database_id] = DB_ID() AND si.[object_id] = stat.[object_id] AND si.index_id=stat.index_id
    LEFT JOIN sys.partition_schemes AS psc ON si.data_space_id=psc.data_space_id
    LEFT JOIN sys.partition_functions AS pf ON psc.function_id=pf.function_id
    LEFT JOIN sys.filegroups AS fg ON si.data_space_id=fg.data_space_id

    /* Key list */
    OUTER APPLY (
        SELECT STUFF ((
            SELECT
                N', ' + QUOTENAME([c].[name]) + CASE [ic].[is_descending_key] WHEN 1 THEN N' DESC' ELSE N'' END
            FROM
                sys.index_columns AS ic
            JOIN
                sys.columns AS c ON ic.column_id=c.column_id and ic.[object_id] = c.[object_id]
            WHERE
                ic.[object_id] = si.[object_id]
                AND [ic].[index_id]=si.index_id
                AND [ic].[key_ordinal] > 0
            ORDER BY
                [ic].[key_ordinal]
            FOR
                XML PATH(''), TYPE).value('.', 'NVARCHAR(MAX)'),1,2,''
        )
    ) AS keys ( key_definition )

    /* Partitioning Ordinal */
    OUTER APPLY (
        SELECT
            MAX(QUOTENAME([c].[name])) AS column_name
        FROM
            sys.index_columns AS ic
            JOIN sys.columns AS c ON ic.column_id=c.column_id and ic.[object_id]=c.[object_id]
        WHERE
            ic.[object_id] = si.[object_id]
            AND [ic].[index_id]=si.index_id
            AND [ic].[partition_ordinal] = 1
    ) AS partitioning_column

    /* Include list */
    OUTER APPLY (
        SELECT STUFF ((
            SELECT
                N', ' + QUOTENAME([c].[name])
            FROM
                sys.index_columns AS ic
                JOIN sys.columns AS c ON ic.column_id=c.column_id AND ic.[object_id]=c.[object_id]
            WHERE
                ic.[object_id] = si.[object_id]
                AND [ic].[index_id]=si.index_id
                AND [ic].[is_included_column] = 1
            ORDER BY
                [c].[name]
            FOR
                XML PATH(''), TYPE).value('.', 'NVARCHAR(MAX)'),1,2,''
        )
    ) AS includes ( include_definition )

    /* Partitions */
    OUTER APPLY (
        SELECT
            COUNT(*) AS partition_count,
            CAST(SUM([ps].[in_row_reserved_page_count])*8./1024./1024. AS NUMERIC(32,1)) AS reserved_in_row_GB,
            CAST(SUM([ps].[lob_reserved_page_count])*8./1024./1024. AS NUMERIC(32,1)) AS reserved_LOB_GB,
            SUM([ps].[row_count]) AS row_count
        FROM
            sys.partitions AS p
            JOIN sys.dm_db_partition_stats AS ps ON p.[partition_id]=ps.[partition_id]
        WHERE
            p.[object_id] = si.[object_id]
            AND p.index_id=si.index_id
    ) AS partition_sums

    /* row compression list by partition */
    OUTER APPLY (
        SELECT STUFF ((
            SELECT
                N', ' + CAST([p].[partition_number] AS VARCHAR(32))
            FROM
                sys.partitions AS p
            WHERE
                [p].[object_id] = si.[object_id]
                AND [p].[index_id]=si.index_id
                AND [p].[data_compression] = 1 -- row compression
            ORDER BY
                [p].[partition_number]
            FOR
                XML PATH(''), TYPE).value('.', 'NVARCHAR(MAX)'),1,2,''
        )
    ) AS row_compression_clause ( row_compression_partition_list )

    /* data compression list by partition */
    OUTER APPLY (
        SELECT STUFF ((
            SELECT
                N', ' + CAST([p].[partition_number] AS VARCHAR(32))
            FROM
                sys.partitions AS p
            WHERE
                [p].[object_id] = si.[object_id]
            AND [p].[index_id]=si.index_id
            AND [p].[data_compression] = 2 -- page compression
        ORDER BY
            [p].[partition_number]
        FOR
            XML PATH(''), TYPE).value('.', 'NVARCHAR(MAX)'),1,2,''
        )
    ) AS page_compression_clause ( page_compression_partition_list )
WHERE
    si.type IN (0,1,2,4,5) /* heap, clustered, nonclustered */
ORDER BY
    table_name, si.index_id
OPTION (RECOMPILE);
GO
Result:
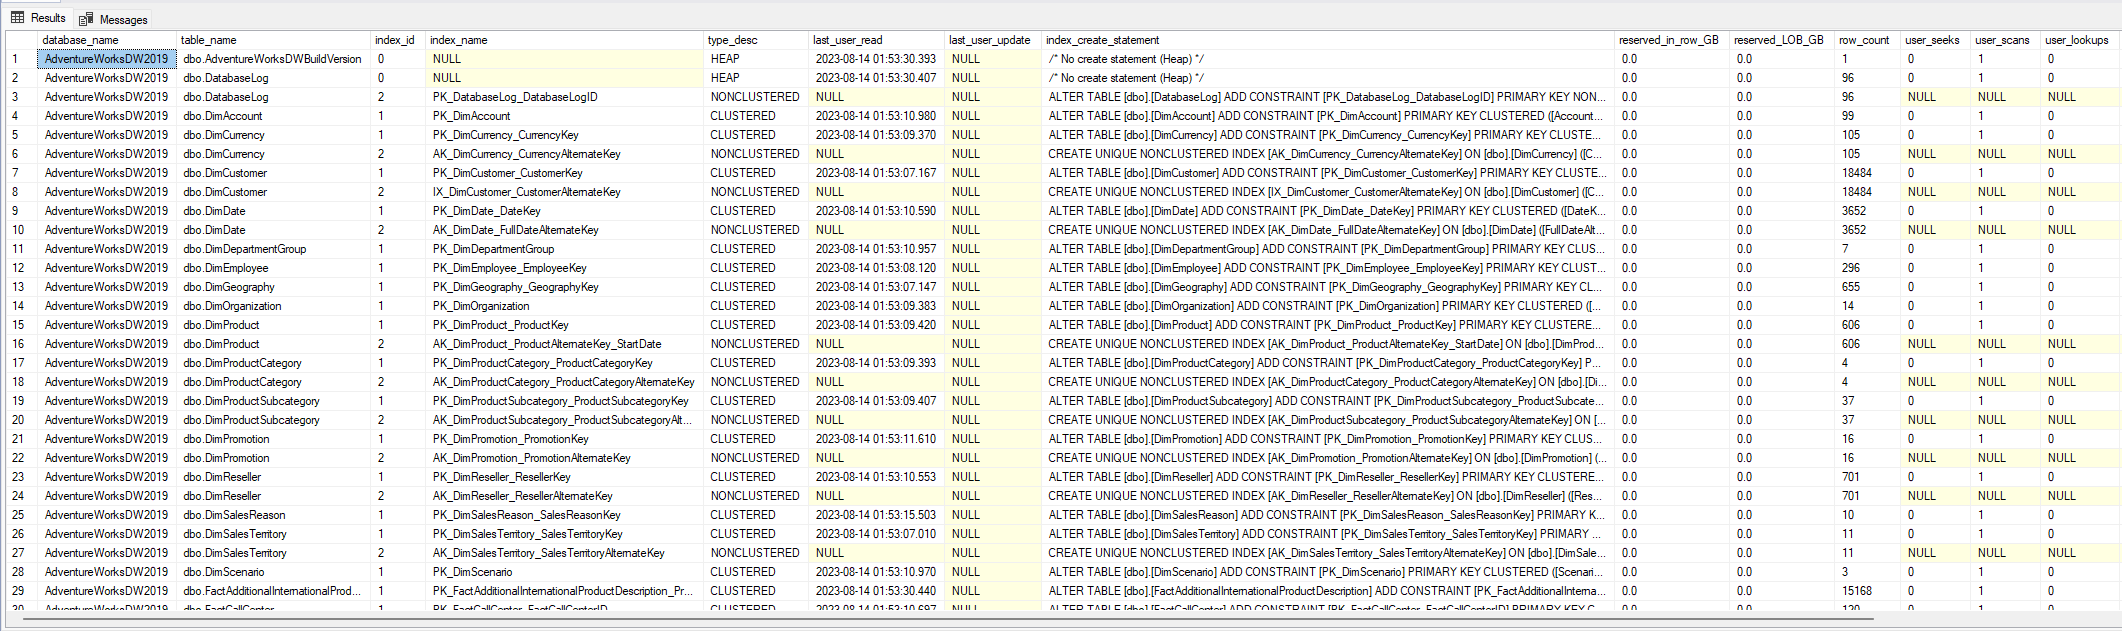
How to generate a script with all database indexes using SSMS
One of the easiest ways to export all database indexes to a SQL script is using SQL Server Management Studio (SSMS) itself.
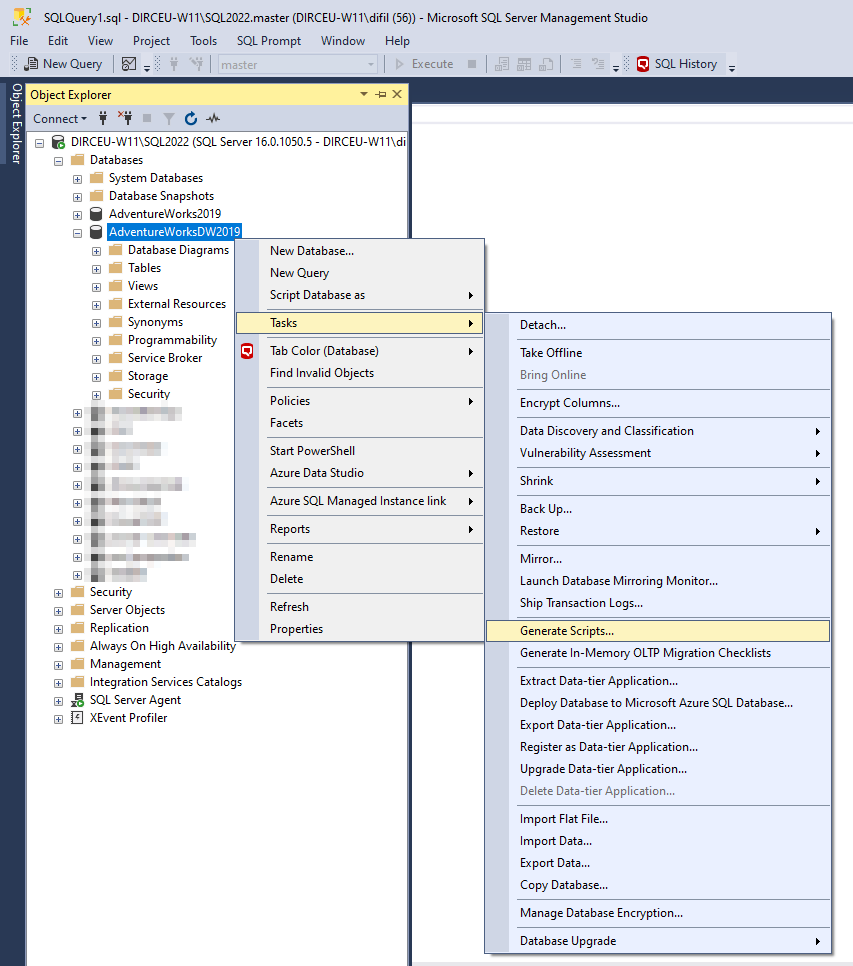
To do this, open the “Object Explorer”, right-click on the database you want to export the indexes and select the “Tasks” option and then “Generate Scripts…”
In this screen that opened, you can proceed, and, optionally, check the option “Do not show this page again”, to skip this introduction screen the next time you open this wizard.

On the next screen, you can use the standard option “Script entire database and all database objects”, to export all database objects, or click on the “Select specific database objects” option to select only the objects you want.

To just export the indexes, I chose the option “Select specific database objects” and marked all the tables.
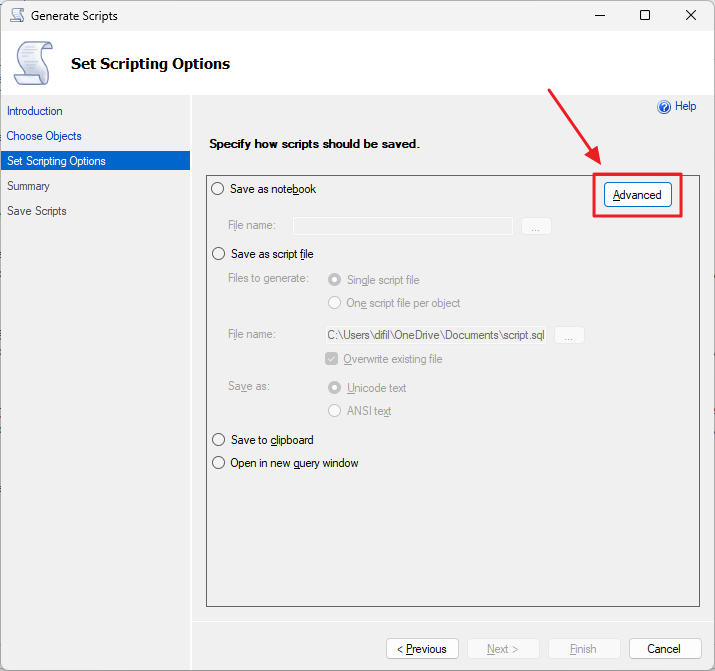
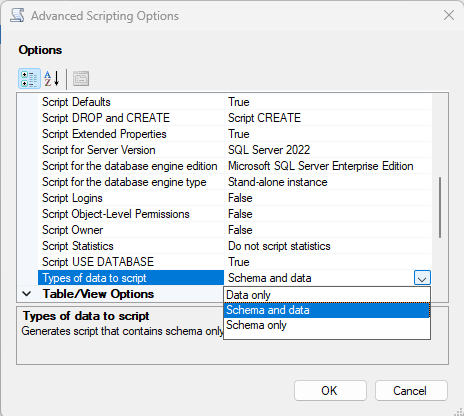
On the screen below, click on the “Advanced” button to display some interesting options in the generated script.
Remember to enable the “Script Full-Text Indexes”, “Script Indexes” and “Script Data Compression options” for a successful export.
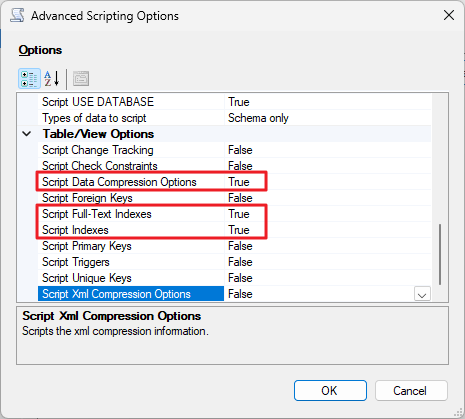
An option that can be very useful is “Types of data to script”. The default option is “Schema only”, which exports only the object definitions. In addition to this option, you can choose “Data only”, which exports only the data (good for dumping just a few tables) and “Schema and data”, which backs up both the object definitions and the data.
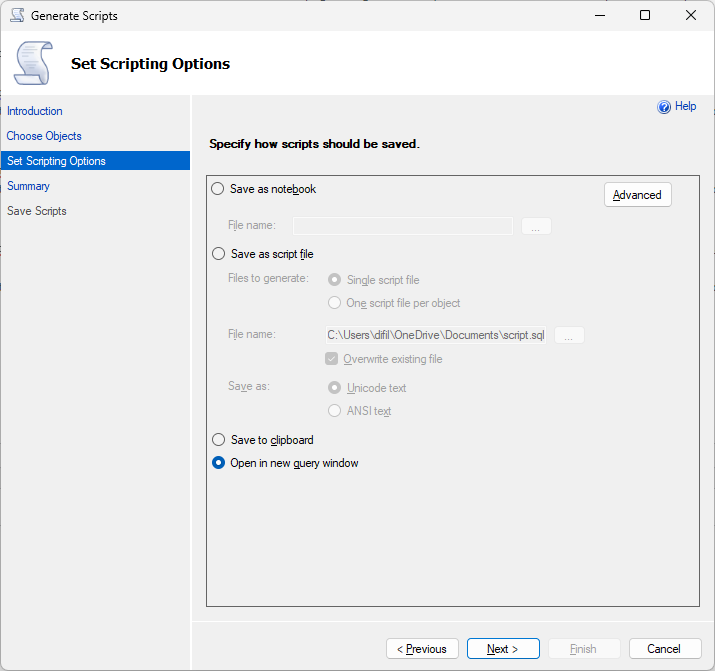
On this screen, you can choose the destination of the generated script, which can be a Jupyter notebook, a SQL script saved on disk, the desktop or a new tab in SSMS. I chose the last option.
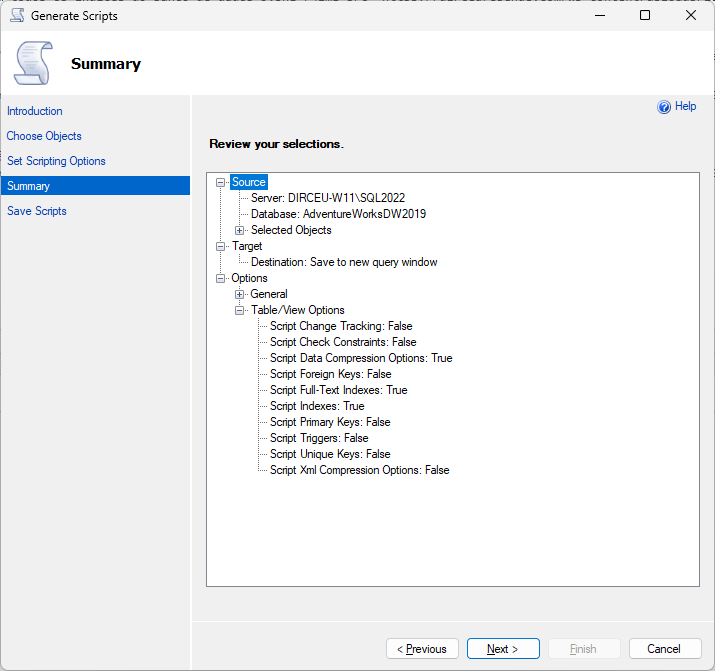
The next screen will show a summary of the actions and settings you selected in the previous steps
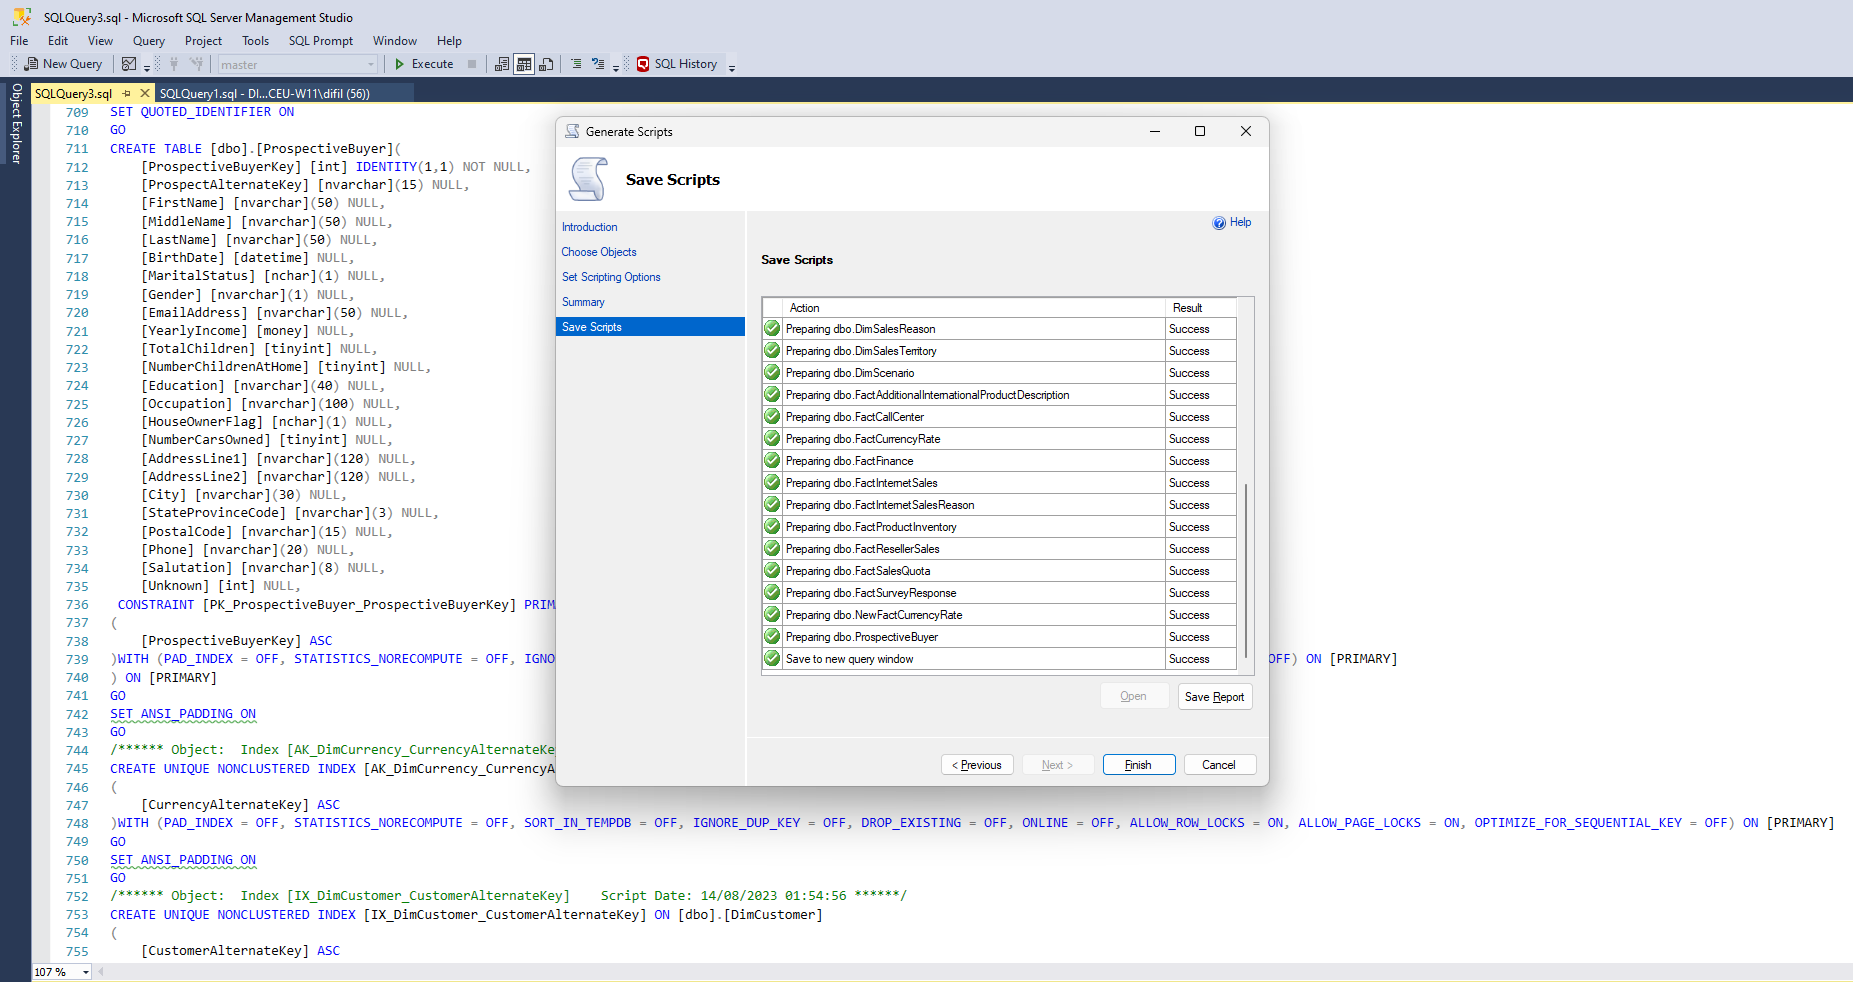
Ready! Script for creating tables and indexes generated successfully.
And that's it, folks!
I hope you liked this tip and see you next time!

Comments (0)
Loading comments...