Hey guys,
Good morning!
In this post, I will demonstrate to you how to install SQL Server on Windows Server 2016. This post is an update of my other post Installing and configuring SQL Server 2014 on Windows Server 2012 R2 and if you are a SQL Server DBA and have not yet installed SQL Server 2016, you will end up facing this scenario very soon.
For this demonstration, I will use SQL Server 2016 Developer Edition (en_sql_server_2016_developer_x64_dvd_8777069) and Windows Server 2016 Datacenter Technical Preview 5 (The final version has not yet been released), recently installed on a virtual machine. I did not make any type of adjustment or configuration in the environment so that the installation is as faithful as possible to a newly created server.
One difference that you will notice when installing SQL Server 2016 is that Management Studio now does not appear in the installation options when you are creating a new instance or adding a node to a cluster, as it is no longer part of the SQL Server 2016 installation.
However, on the initial installation screen itself, there is an option for you to click and be directed to a link where you can download the Management Studio installer.
How to install and configure Microsoft SQL Server 2016How to install and configure Microsoft SQL Server 2016
- 1) Insert the SQL Server 2016 installation disc into your DVD/USB drive for the installation to begin.
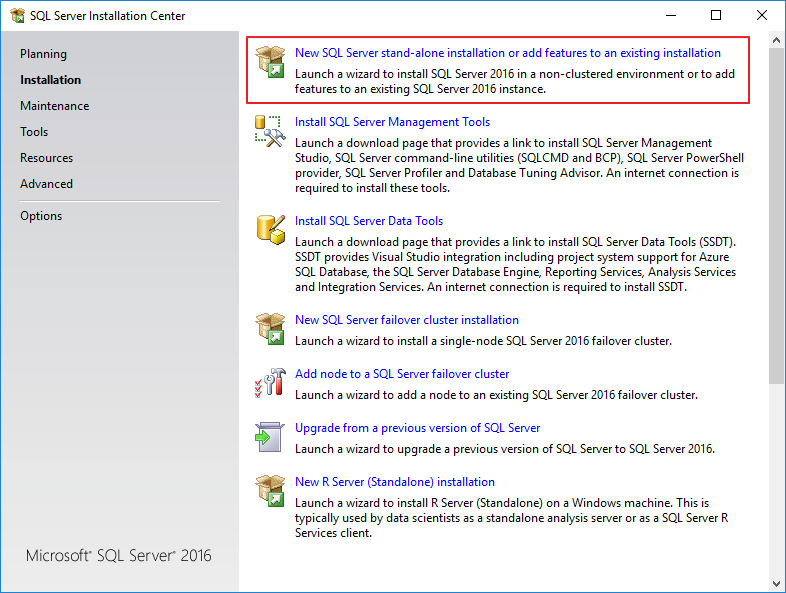
- 2) In this example, we will install a new stand-alone instance (which is not part of a cluster). To do this, click on the option “New SQL Server stand-alone installation or add features to an existing installation”
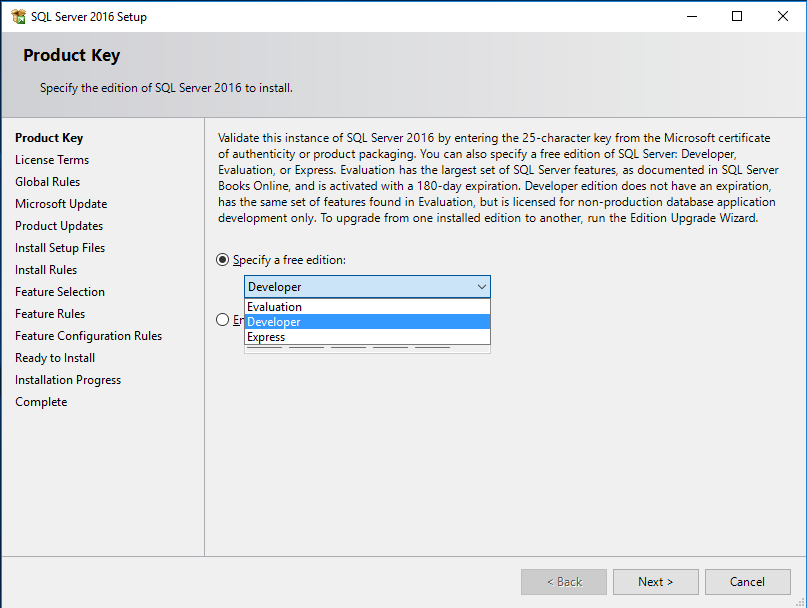
microsoft-sql-server-2016-installation-1 - 3) On this screen, you can choose the edition of SQL Server that you will install and enter your license registration key. In this example, I will use the Developer Edition, which is the complete edition of SQL Server and free for developers, students and any type of IT professional, as long as corporate data from production environments is not used
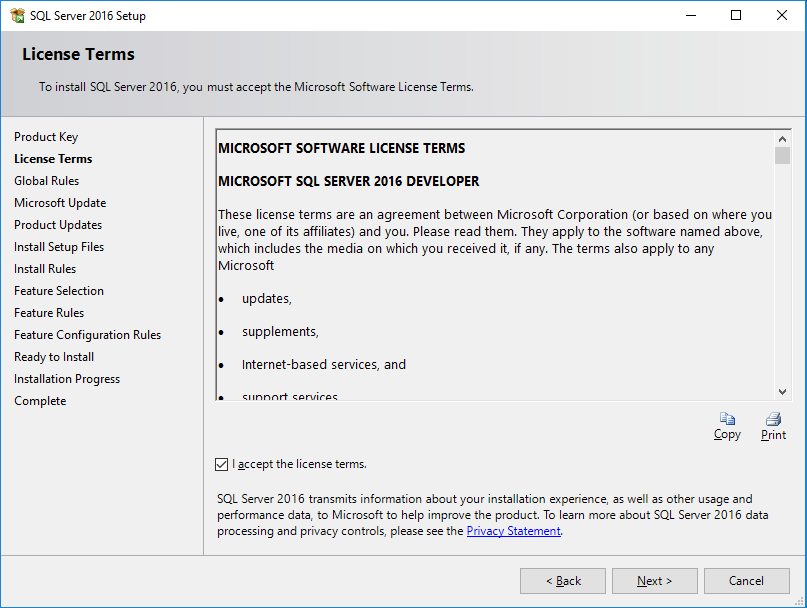
microsoft-sql-server-2016-installation-2 - 4) On this screen, you read and accept the SQL Server 2016 license terms
microsoft-sql-server-2016-installation-3 - 5) On the next screen, you can activate the option to use Microsoft Update to activate automatic updates for SQL Server 2016 and other Microsoft software

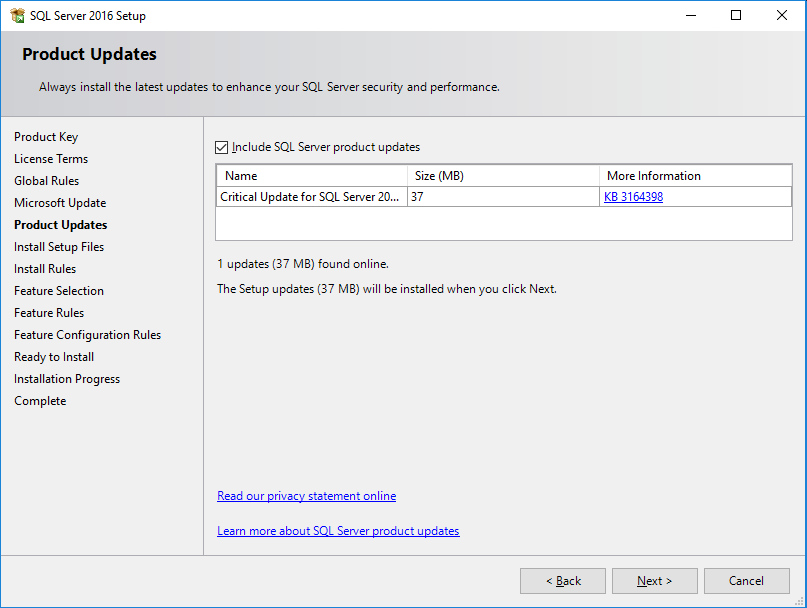
microsoft-sql-server-2016-installation-4 - 6) This screen displays critical patches and updates specific to the SQL Server 2016 product. It is highly recommended to download the updates presented in this step.
microsoft-sql-server-2016-installation-5 - 7) Once the patches have been downloaded and installed, you will be directed to this screen, containing a checklist of prerequisites for installing SQL Server 2016.
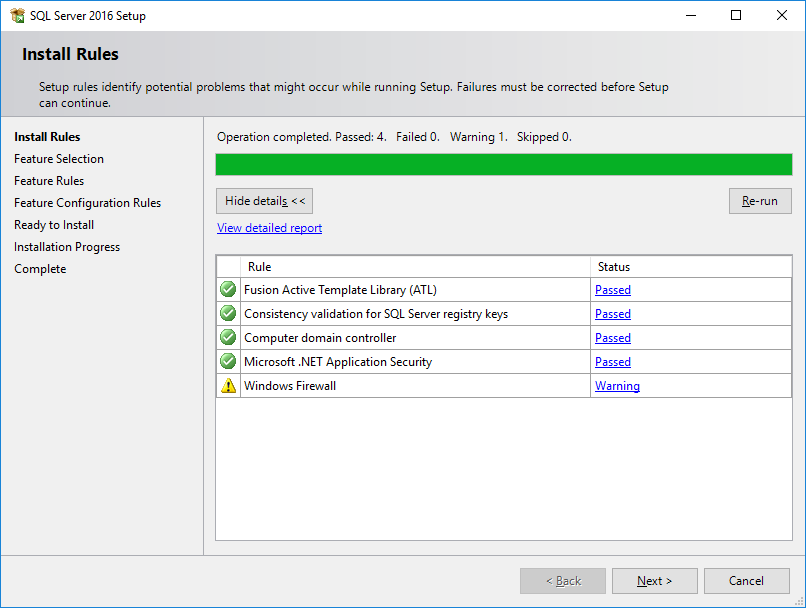
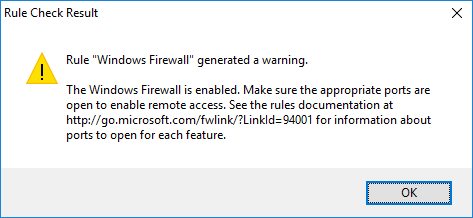
microsoft-sql-server-2016-installation-6 Note that there is an alert in the Firewall section, informing that Windows Firewall is enabled, and therefore, the SQL Server ports must be released so that remote connections can access the new instance (http://go.microsoft.com/fwlink/?linkid=94001)
microsoft-sql-server-2016-installation-7 At the end of the post I will demonstrate how to configure Windows Firewall correctly so that the instance is accessible for remote connections.
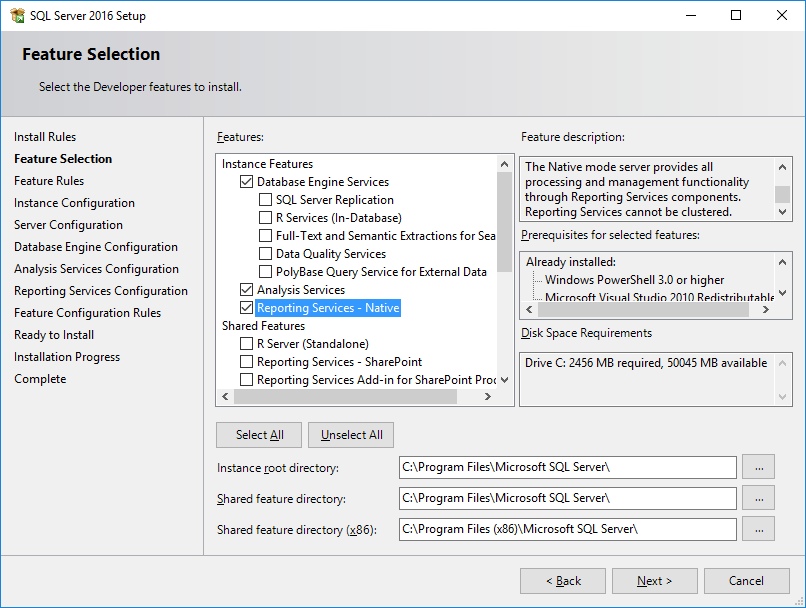
- 8) At this installation stage, we can define which SQL Server resources we will install on our instance. Notice the number of new features in SQL Server 2016. This is the version with the largest number of improvements and new features in the history of SQL Server. For this example, I only marked the features “Database Engine”, “Analysis Services” and “Reporting Services – Native”
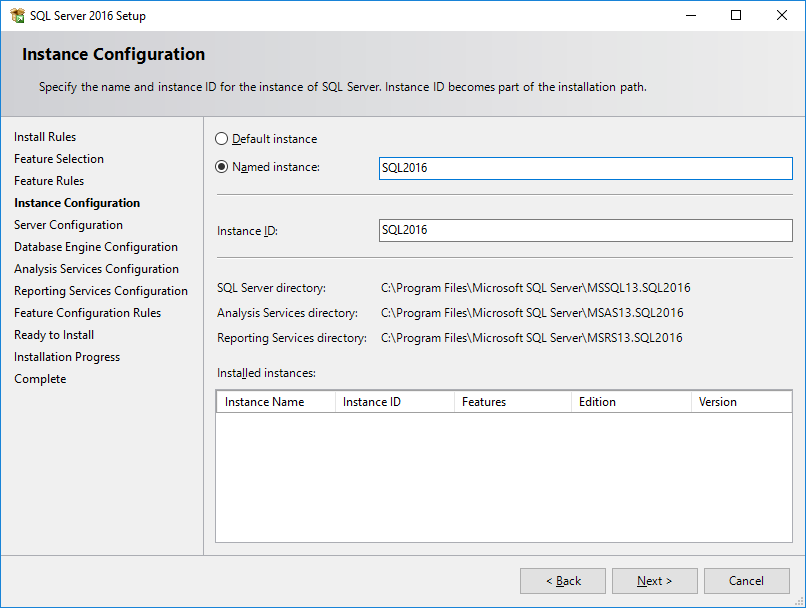
microsoft-sql-server-2016-installation-8 - 9) After selecting the resources that will be installed, we will define the name of the instance that we will be installing. By configuring the instance as the default “Default instance”, it will not be necessary to enter the instance name to connect to the SQL Server server. Otherwise, to connect to the database, you will have to enter the server and instance name. Ex: home_server\Test instance.
An instance, whether default or named, has its own set of program and data files, as well as a set of common files shared among all SQL Server instances on the computer. For this reason, even if you install SQL Server as the default instance, you MUST provide the instance ID.
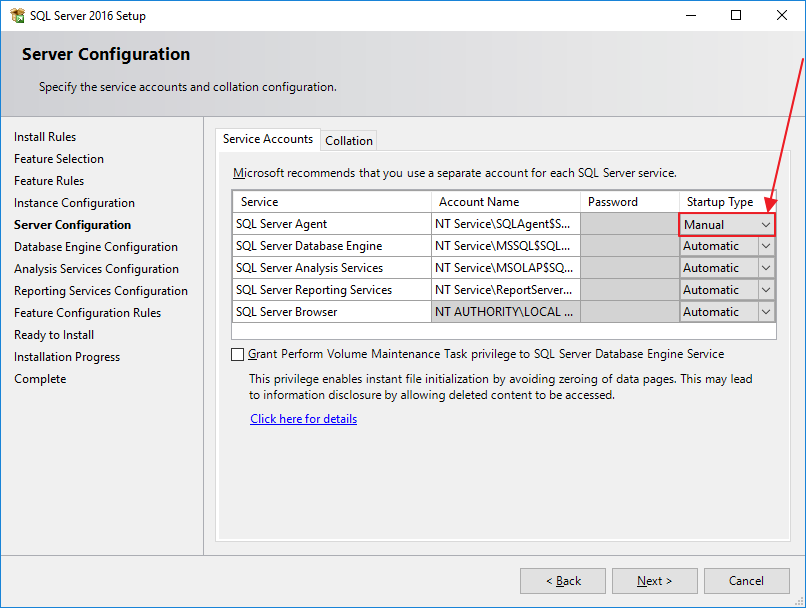
microsoft-sql-server-2016-installation-9 - 10) On this screen, we can define how the services are started and which accounts will be used for each service. Generally I don't make any changes to this screen, I just change the SQL Server Agent startup from Manual to Automatic.
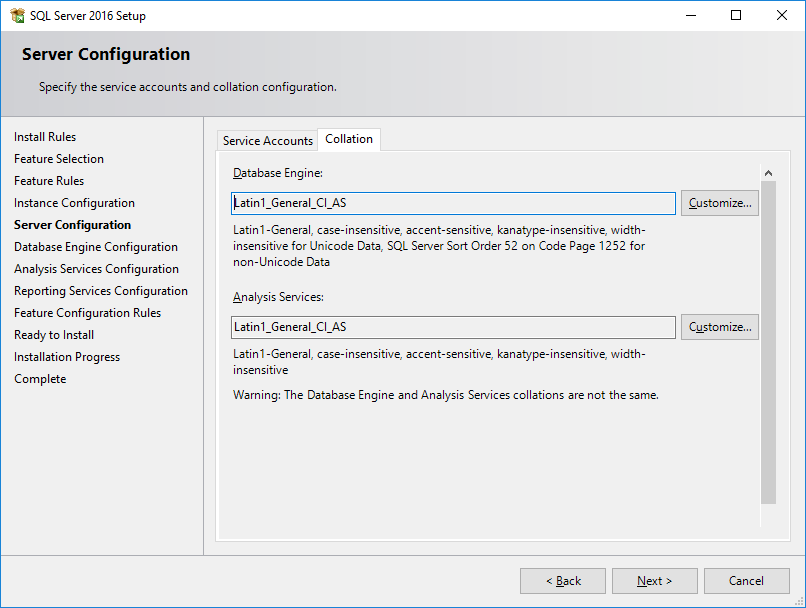
microsoft-sql-server-2016-installation-10 In the “Collation” tab, we can define the character language of the database and Analysis Services. This is where we define whether the bank will support accentuation, whether it will be case-sensitive (lowercase letters are different from uppercase letters. This is the default setting) or case-insensitive (uppercase and lowercase letters are interpreted by the bank as the same thing).
Note: The collation of tables may be different from the collation of a specific column, which may also be different from the collation of the database. The database Collation is used to define the default collation of tables and columns when it is not specified.
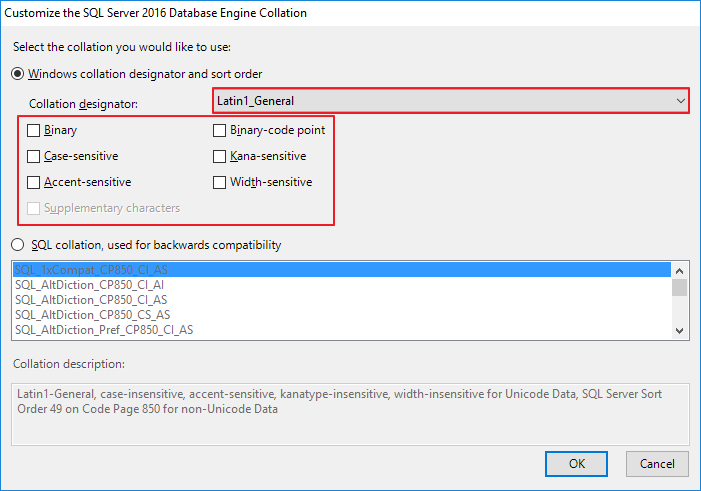
microsoft-sql-server-2016-installation-11 By clicking on the “Customize” button (optional), we can customize the database collation according to our needs. Personally, I don't really like using the Case-Sensitive bench, despite it being a good practice. I generally use the Latin1_General_CI_AI collation, but it is at the discretion of each DBA and/or your company's environment.
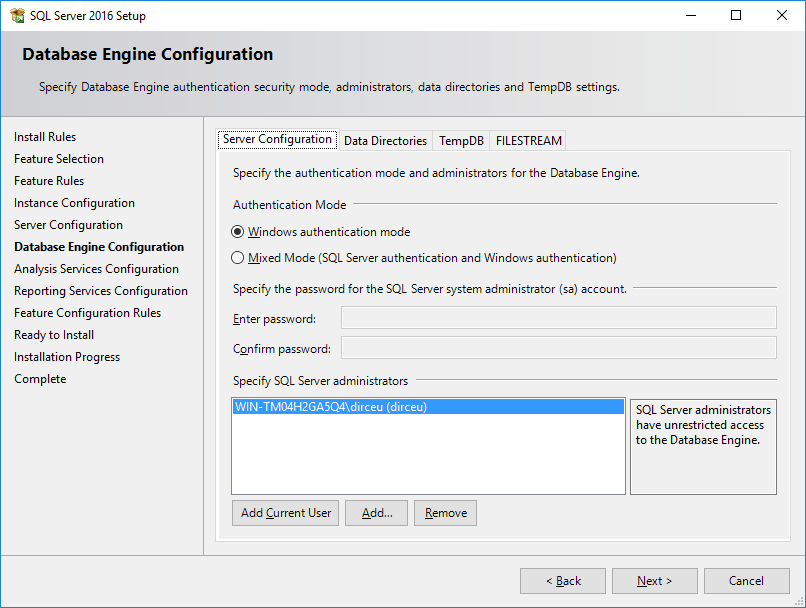
microsoft-sql-server-2016-installation-12 - 11) In this step, we can configure the user authentication method: Windows authentication (Active Directory) or Mixed authentication (Active Directory and SQL Server authentication). Furthermore, we can configure the users who will be administrators of the instance.
To add the logged in user who is installing SQL Server, simply click on the “Add Current User” button.
SQL Server authentication modes are:
– Windows authentication: Uses Active Directory to authenticate users and only allows users who are registered in AD. It is not necessary to enter a username and password.– Mixed Mode: Allows both authentication using Active Directory and SQL Server authentication, where the login is created in the database and is accessed using username and password. It is the most common option, as most of the time, applications and systems do not use AD users, and the configuration within the application to use SQL Server users is much simpler.
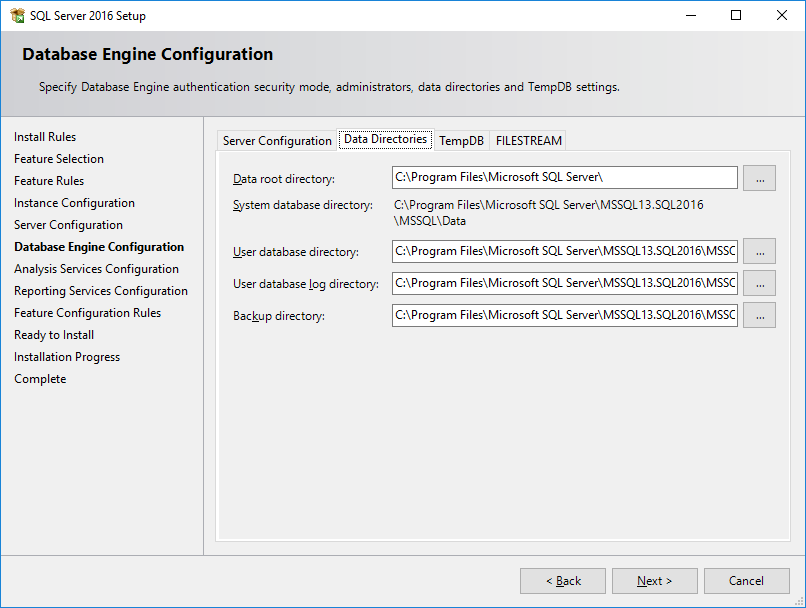
microsoft-sql-server-2016-installation-13 In the “Data Directories” tab, you can choose the data root directory, backup directory, log backup directory and data backup.
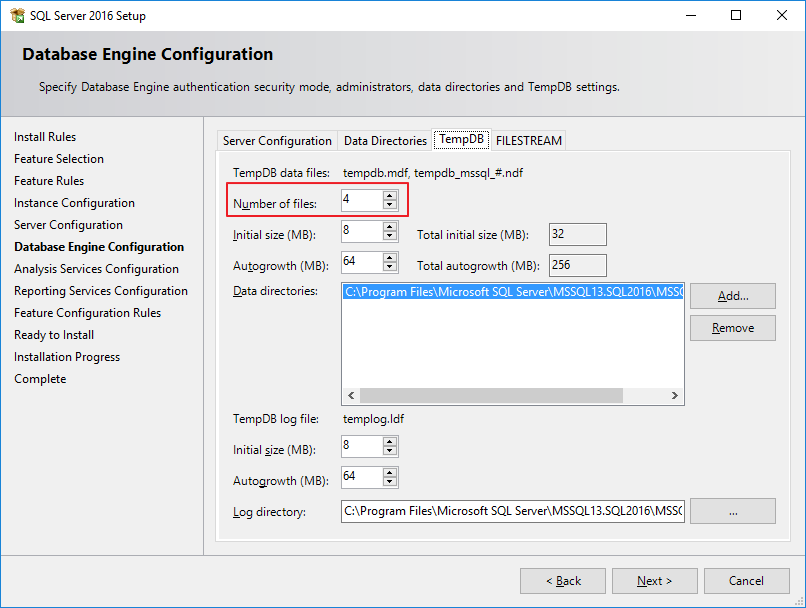
microsoft-sql-server-2016-installation-14 The “TempDB” tab is a new tab and much requested by DBA’s in previous versions, who installed the database and then had to create other TempDB files, generating unnecessary additional work. The creation of multiple TempDB files is a suggestion from Microsoft itself, to avoid contention of TempDB in the instance and enabling an interesting performance gain, especially if the TempDB files were stored on another disk/LUM of the data/log of the other databases to avoid I/O competition.
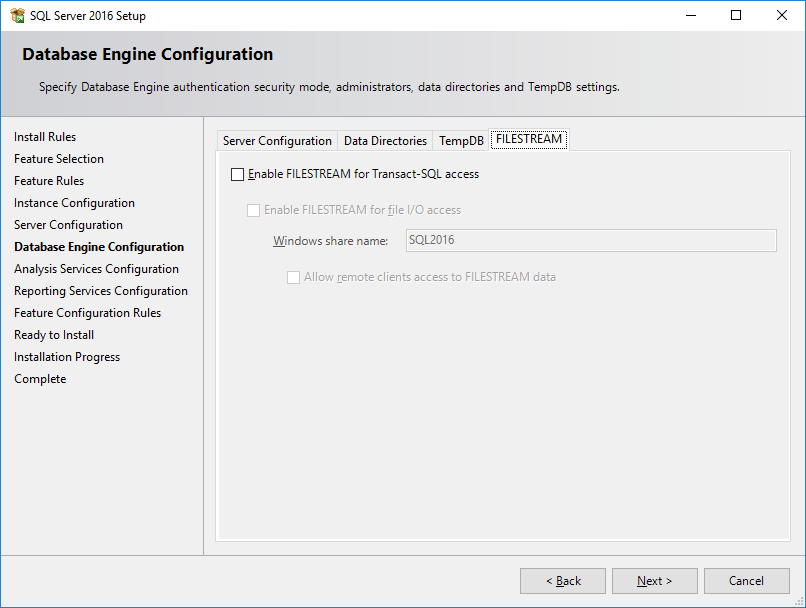
microsoft-sql-server-2016-installation-15 Finally, in the “FILESTREAM” tab it is possible to define whether this feature will be enabled in the database. FILESTREAM integrates SQL SERVER with the NTFS file system, storing objects of type (BLOB) with type varbinary(max) using the NTFS file system for this storage. It is possible through T-SQL to insert, delete, update and query and backup this data natively
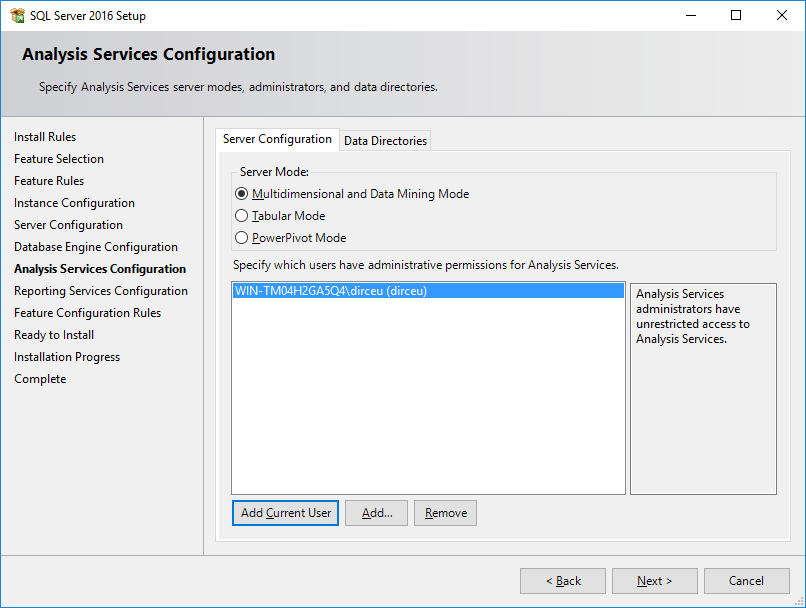
microsoft-sql-server-2016-installation-16 - 12) On this screen, we can configure Analysis Services (Cubes), where you can define the type of data modeling (Multidimensional – Standard Option) and the “new” Tabular mode, present from SQL Server 2012 (See the difference between the two here) and specify Analysis Services Administrator users.
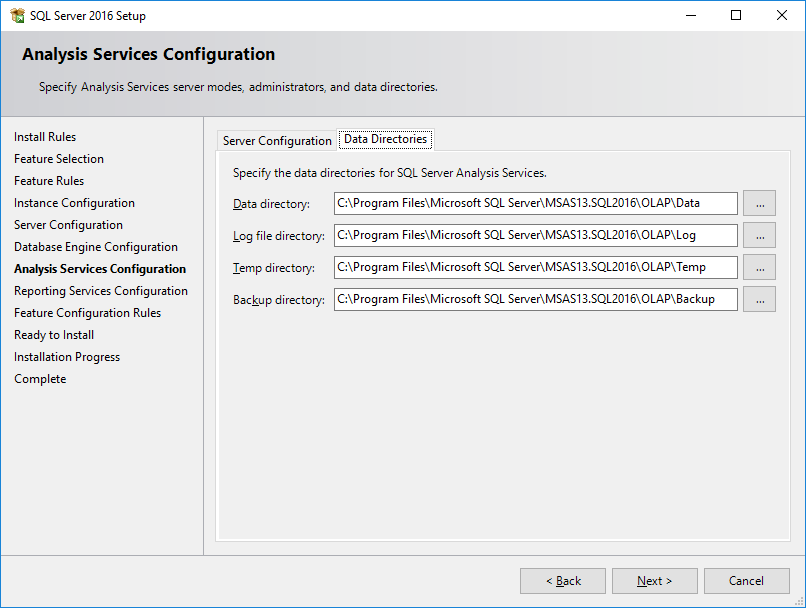
microsoft-sql-server-2016-installation-17 Once again, installing SQL Server allows us to define the directories where Analysis Services Cubes data will be physically written to disk, such as data files, log files, the temporary directory, and the default backup directory.
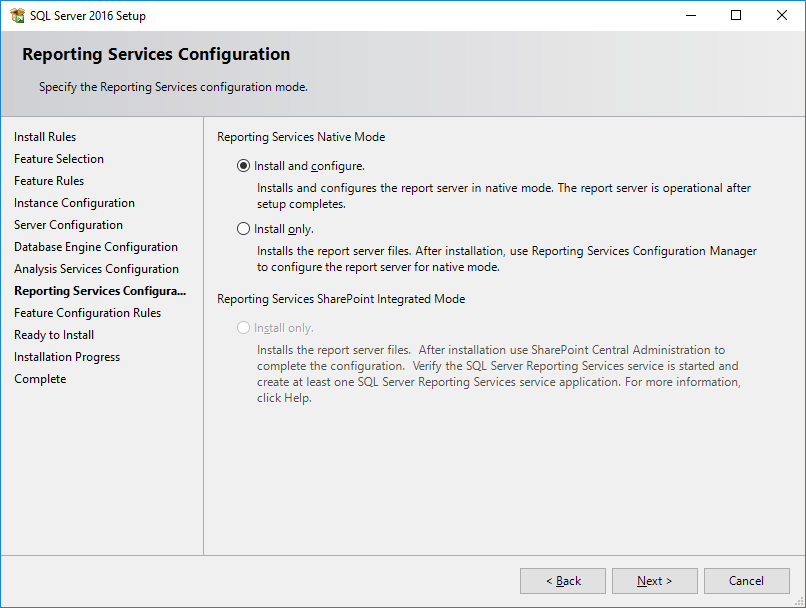
microsoft-sql-server-2016-installation-18 - 13) Here, we can install and configure Reporting Services or just perform the installation and leave the configuration later. I selected the second option and I will demonstrate how to install and configure Microsoft Reporting Services 2016 in another specific post for this.
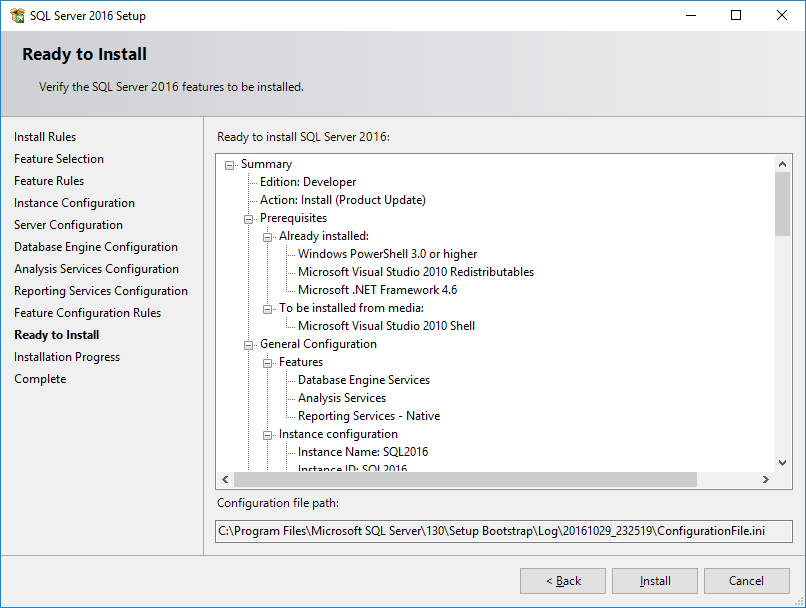
microsoft-sql-server-2016-installation-19 - 14) In this step, the installation shows us all the defined features and settings for us to review before starting the installation.
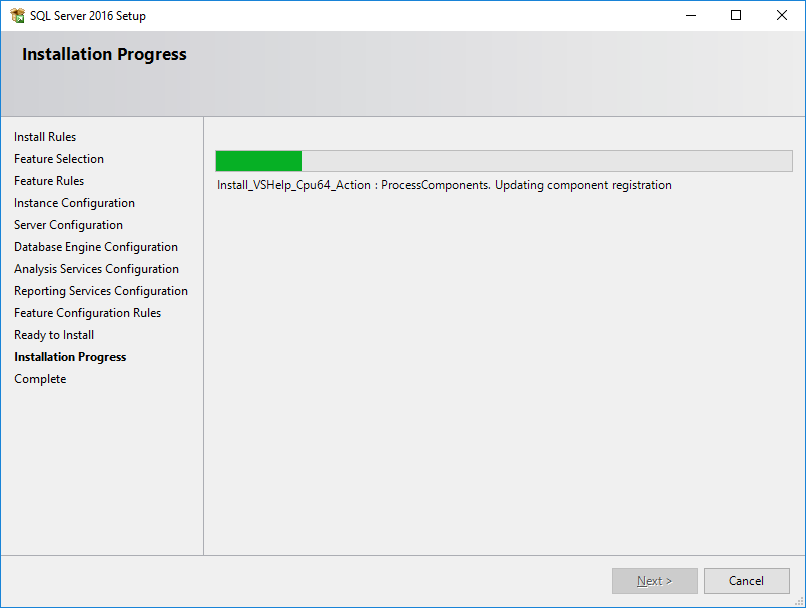
microsoft-sql-server-2016-installation-20 - 15) SQL Server 2016 is currently being installed on your machine/server.
microsoft-sql-server-2016-installation-21 - 16) If everything went as expected, you should see this screen at the end of the installation process. Microsoft SQL Server 2016 INSTALLED.
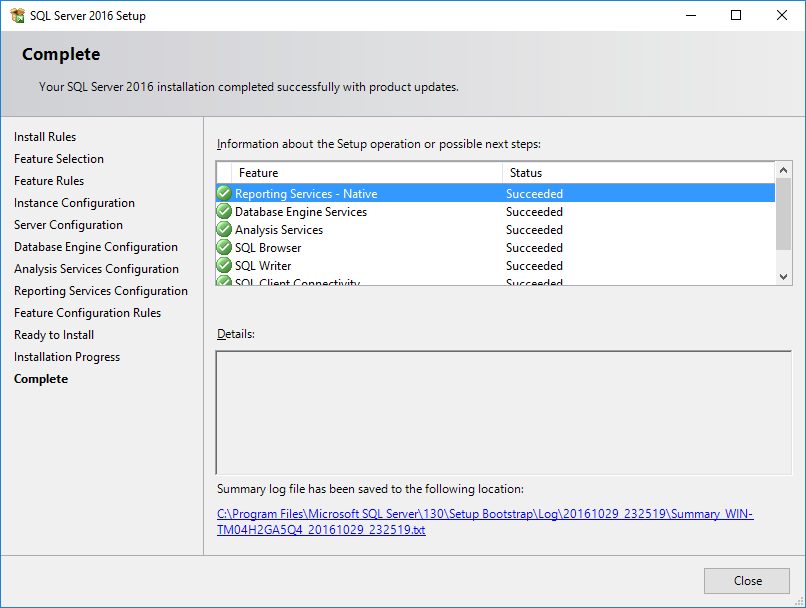
microsoft-sql-server-2016-installation-22
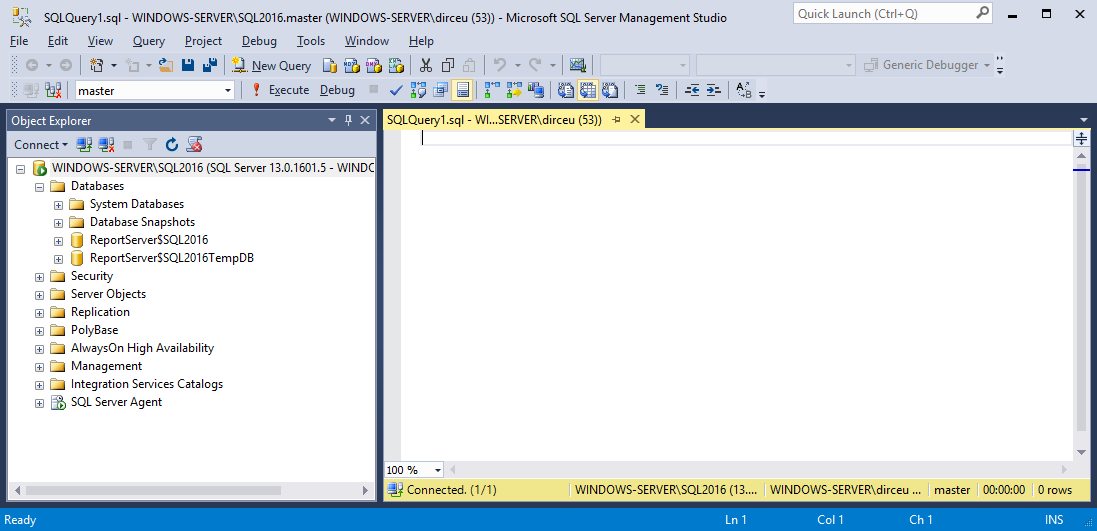
How to install and configure Microsoft SQL Server Management Studio 2016
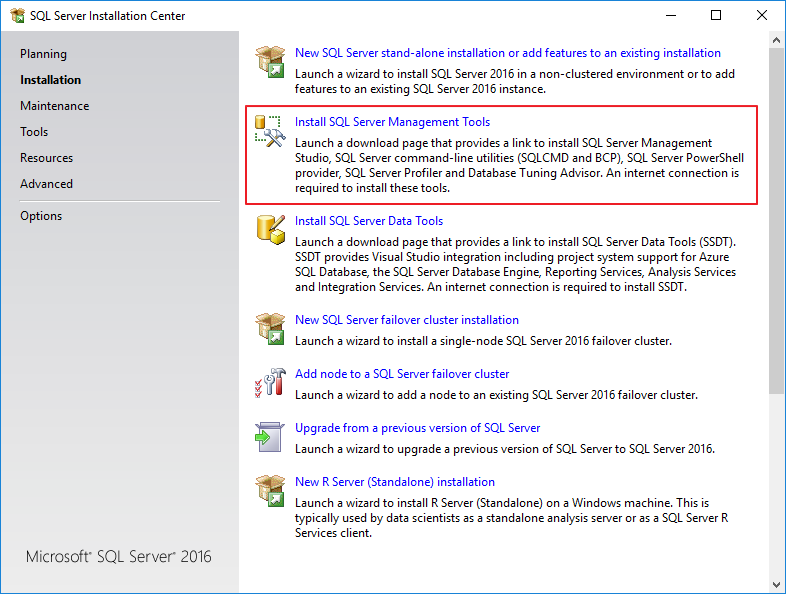
As I mentioned at the beginning of this post, the installation of SQL Server 2016 no longer comes with Management Studio. You will need to download it separately to your server to install it.
To do this, simply run the installer again and select the “Install SQL Server Management Tools” option, which will open your web browser to the download page (https://go.microsoft.com/fwlink/?LinkId=531355).
At this step, due to Windows Server download restrictions, you will not be able to download the installer or any executable program. Therefore, I recommend downloading the file on a common machine and then transferring the installer to your server, preventing security policies from having to be changed.
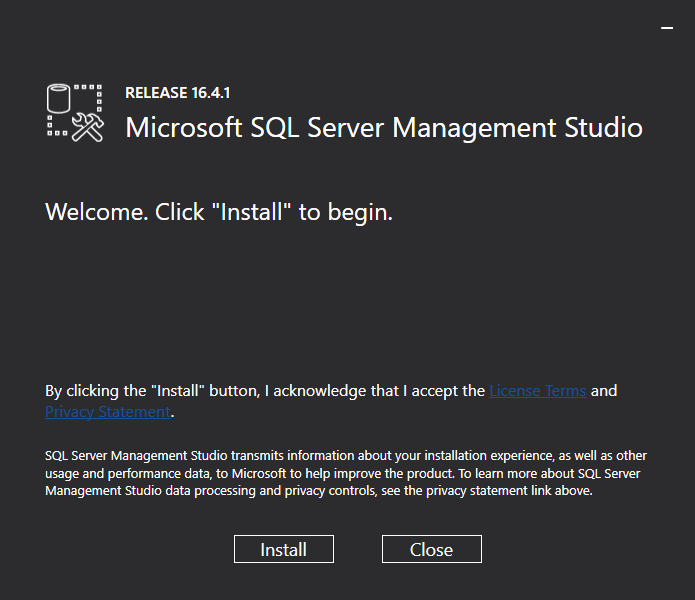
Once the executable is already on the server, simply start the installation
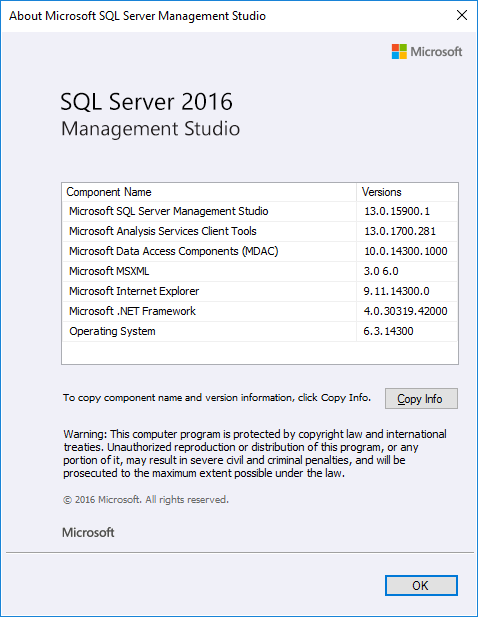
If everything goes well, you will see a table like this:
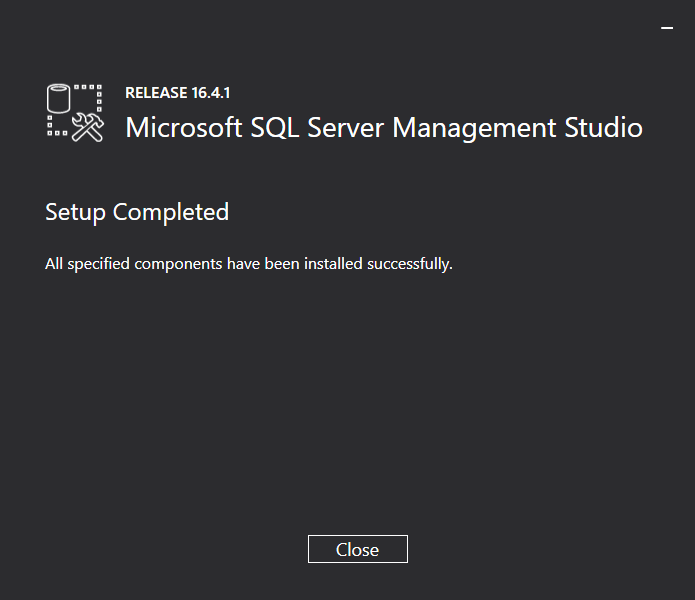
Installation complete. SQL Server 2016 Management Studio installed.
Enabling the TCP protocol and setting the default SQL Server connection port
Now that we have configured our server, we need to enable external connections to SQL Server, since in most cases, access is made from machines other than the server, as in my case, where the server is in the virtual machine and I access the database through Management Studio on the physical machine.
Before activating the Firewall rules, we need to define the connection port for our SQL Server instance.
To do this, run SQL Server 2016 Configuration Manager by accessing the Start menu > All Programs > Microsoft SQL Server 2016 > Configuration Tools.
For direct access, you can use the path “C:\ProgramData\Microsoft\Windows\Start Menu\Programs\Microsoft SQL Server 2016\Configuration Tools” or the direct path of the executable: “C:\Windows\SysWOW64\mmc.exe /32 C:\Windows\SysWOW64\SQLServerManager13.msc”
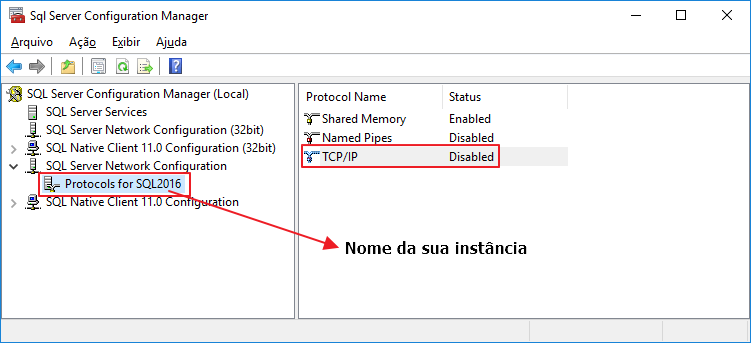
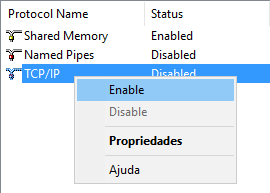
When the screen opens, select the option “SQL Server Network Configuration” > “Protocols for SQL2016 (Your instance name here)”.
Right-click and select the “Enable” option to enable this protocol.
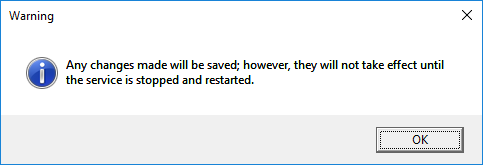
This message will appear on the screen, informing that the changes will only take effect after restarting the service:
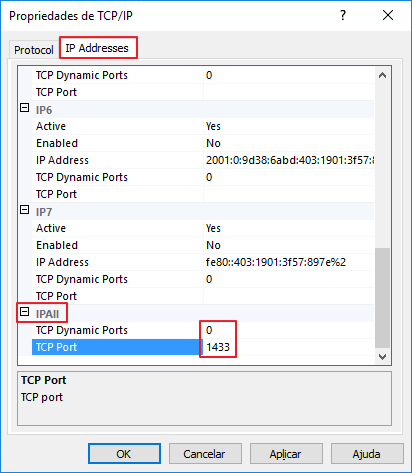
Double-click on the “TCP/IP” option to open this screen below. It is important that the value of the “TCP Dynamic Ports” parameter is 0 (Disabled), as this option consists of using random ports to connect to SQL Server. For the Firewall, this is not legal, because they would have to have several ports open or even disable the Firewall to allow remote connections. Another important point is that on this screen, we can define the instance's default connection port. I will use the SQL Server default (1433), but it is up to you.
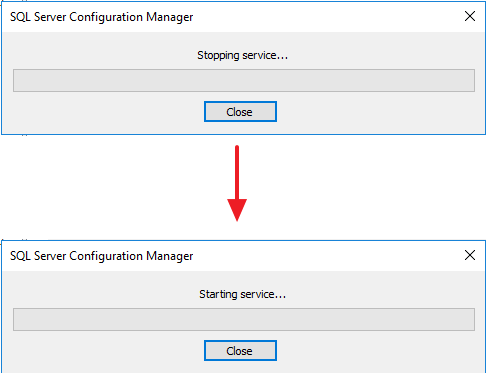
After confirming the changes, a message will again be shown that the changes have been applied but will only take effect after restarting the service, and that is what we will do now.
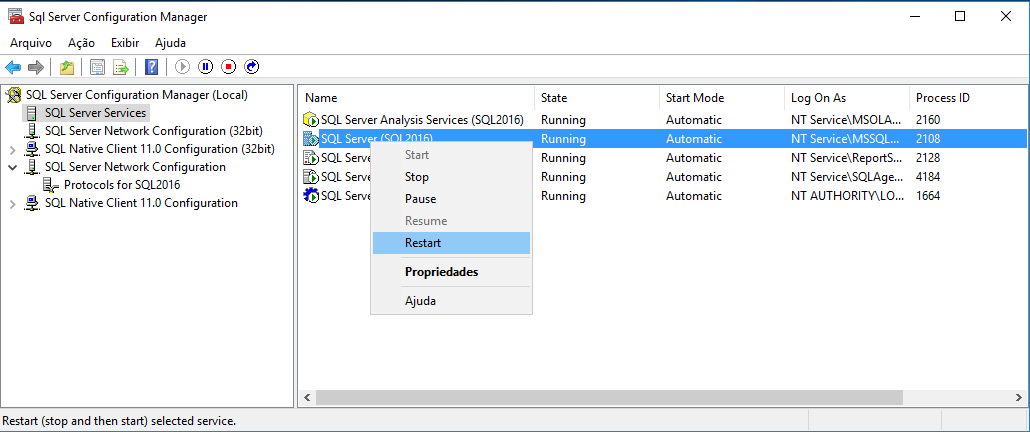
Still in SQL Server Configuration Manager, click on the “SQL Server Services” option, select the “SQL Server (SQL2016)” service, right-click and select the “Restart” option.
Now all that’s left is the Windows Firewall rules.
Adding rules in Windows Firewall
Although we have already enabled external connections during installation, our server's Firewall is probably blocking the ports necessary for SQL Server from another machine to access our server. To do this, simply execute the commands below in Prompt-DOS, logged in as Administrator:
netsh advfirewall firewall add rule name="Open Port 80" dir=in action=allow protocol=TCP localport=80

@echo =========  SQL Server Ports  ===================
@echo Enabling SQLServer default instance port 1433
netsh advfirewall firewall add rule name="SQL Server" dir=in action=allow protocol=TCP localport=1433
@echo Enabling Dedicated Admin Connection port 1434
netsh advfirewall firewall add rule name="SQL Admin Connection" dir=in action=allow protocol=TCP localport=1434
@echo Enabling Conventional SQL Server Service Broker port 4022
netsh advfirewall firewall add rule name="SQL Service Broker" dir=in action=allow protocol=TCP localport=4022
@echo Enabling Transact SQL/RPC port 135
netsh advfirewall firewall add rule name="SQL Debugger/RPC" dir=in action=allow protocol=TCP localport=135

@echo =========  Analysis Services Ports  ==============
@echo Enabling SSAS Default Instance port 2383
netsh advfirewall firewall add rule name="Analysis Services" dir=in action=allow protocol=TCP localport=2383
@echo Enabling SQL Server Browser Service port 2382
netsh advfirewall firewall add rule name="SQL Browser" dir=in action=allow protocol=TCP localport=2382

@echo =========  Misc Applications  ==============
@echo Enabling HTTP port 80
netsh advfirewall firewall add rule name="HTTP" dir=in action=allow protocol=TCP localport=80
@echo Enabling SSL port 443
netsh advfirewall firewall add rule name="SSL" dir=in action=allow protocol=TCP localport=443
@echo Enabling port for SQL Server Browser Service's 'Browse' Button
netsh advfirewall firewall add rule name="SQL Browser" dir=in action=allow protocol=UDP localport=1434
@echo Allowing multicast broadcast response on UDP (Browser Service Enumerations OK)
netsh firewall set multicastbroadcastresponse ENABLE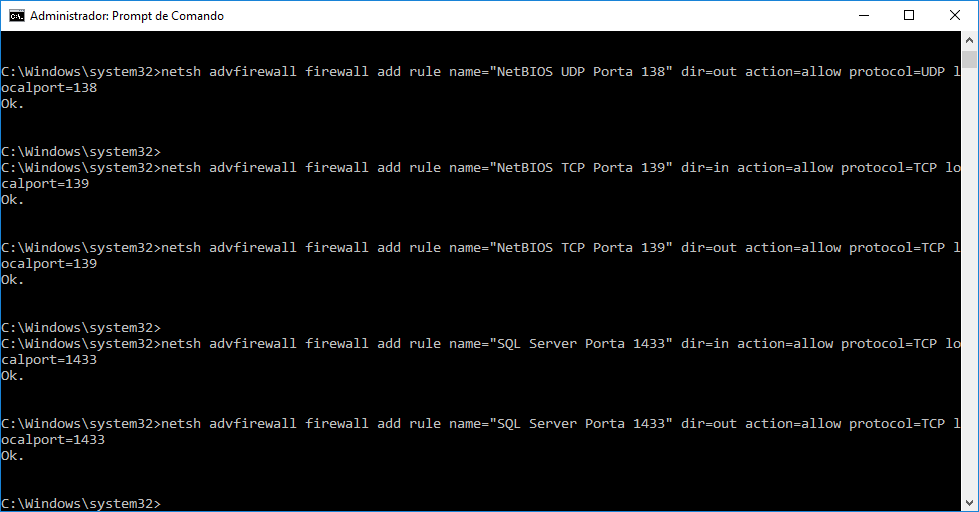
Remembering that, if you have changed the default port of a service, you will need to change this script to inform the default port that you defined for the given service.
If you are using a virtual machine (VM), you will need to use Bridge mode, so that your server has a public IP on your network and is accessible by other machines or VMs. See more by accessing the post How to configure your VM's network in Bridge mode in VMware Player.
That's it, folks!
A hug and see you in the next post.
SQL Server Step-by-step tutorial how to install and configure Microsoft SQL Server 2016 on Windows Server 2016 how to install SQL Server 2016
SQL Server Step-by-step tutorial how to install and configure Microsoft SQL Server 2016 on Windows Server 2016 how to install SQL Server 2016

Comentários (0)
Carregando comentários…