Hello readers,
Good morning!
Today I will show you how to install Microsoft SQL Server 2014 on Windows Server 2012 R2 on a virtual machine. The process to install on a physical machine is the same, with no differences.
If you are looking for the updated version of this post, with the most up-to-date versions of SQL Server and Windows Server, find out more by accessing the post How to install and configure Microsoft SQL Server 2016 on Windows Server 2016
Installing SQL Server
- Insert the media containing the SQL Server installation or unzip the ISO image into a directory.
- Open the root directory of SQL Server installation files and run the “setup.exe” file
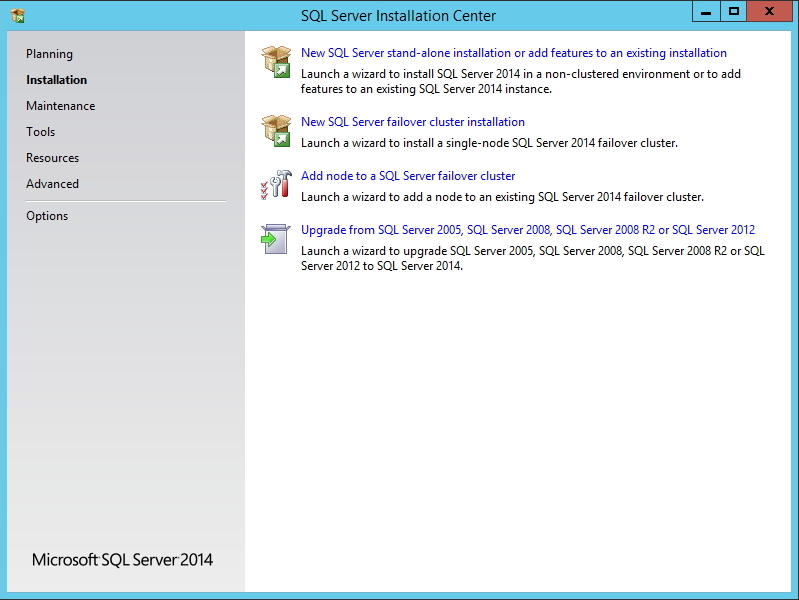
SQL Server 2014 - Home Screen - Click on the “Installation” option in the left side menu and then on “New SQL Server stand-alone installation or add features from an existing installation”. This option is used to install SQL Server on just one machine and is the one I will use in this tutorial.
- If you wish to create a cluster of SQL Server servers (the database will run on more than 1 machine simultaneously, balancing the load and increasing the availability of the service, since if one of the servers fails, the others take over the activities of the one that failed), select the second option, “New SQL Server failover cluster installation”.
- The third installation option “Add node to a SQL Server failover cluster” is for you to add a machine to an existing cluster.
- The last option on the installation screen is for those who already have a previous version of SQL server installed and want to update their version to 2014.

SQL Server - Activation Key - Enter the SQL Server 2014 activation key or choose the first option (specify a free edition) to use in the product evaluation mode (Trial).
- Accept the terms of use and click “Next”.
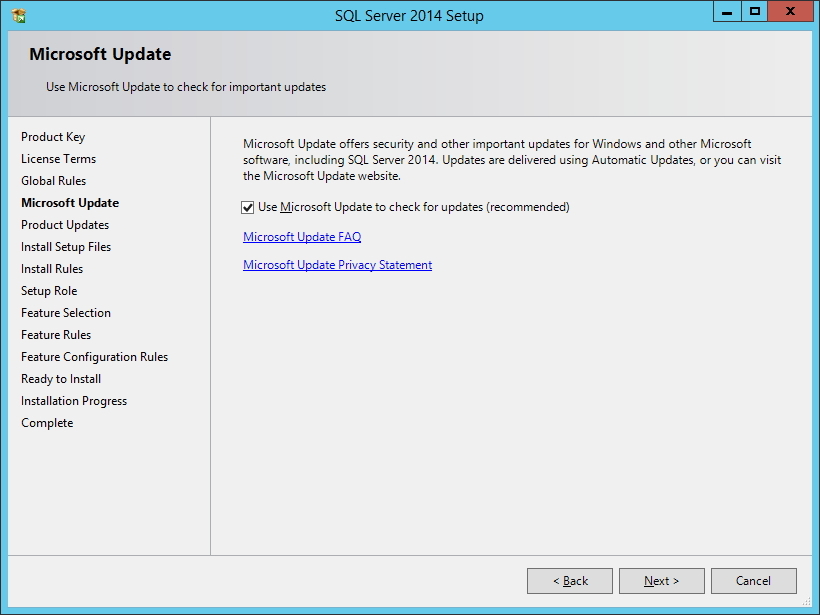
SQL Server - Updates - Here you define whether you will use SQL Server automatic updates or not. I recommend enabling this option, as updates often bring fixes for functionality and security flaws, performance improvements and additions of new features. Click “Next”.
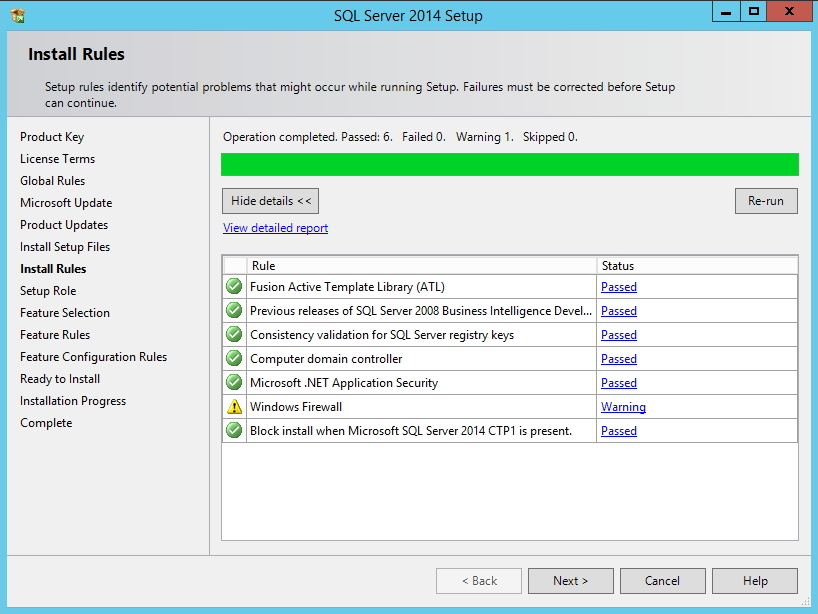
SQL Server - Requirements validation screen - On this screen, SQL Server will list the prerequisites for installation. For me, it generated a Warning warning that I must configure the ports in the Firewall to allow remote connections (Find out more here). If everything is ok, click “Next”.
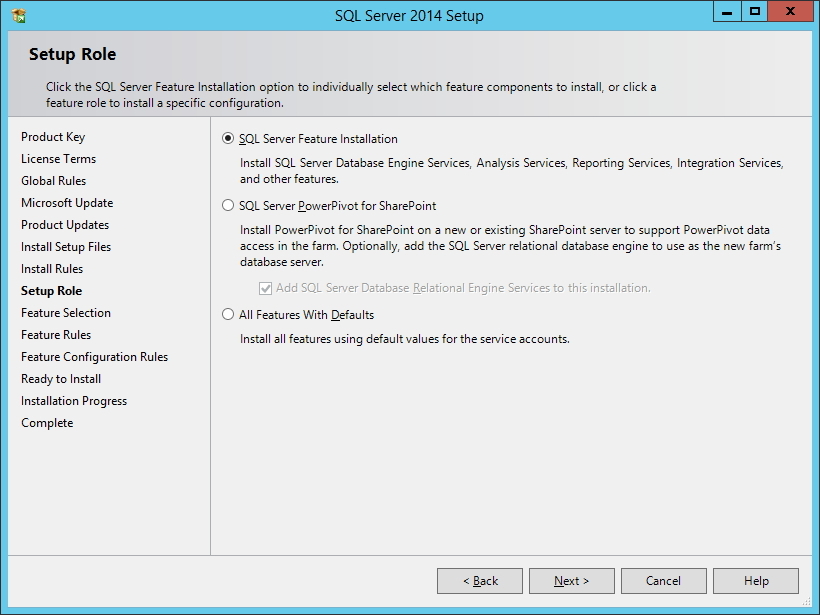
SQL Server - Installation Type - Here we will define the SQL Server installation type.
– In the “SQL Server Feature Installation” option, the installation will allow you to select each of the components, which include the Database, Analysis Services (Cubes / BI), Reporting Services (Data extraction and reporting tool) and Integration Services (Programming tool using T-SQL and other resources such as file manipulation, Excel generation, etc.). By selecting this option, we will configure each of the services on the next screens and it does not come with anything pre-selected.
– In the “SQL Server PowerPivot for SharePoint” option, you will install the PowerPivot feature on the Sharepoint server and can optionally choose to install the database on the server.
– In the “All Features with Defaults” option, the installation will select all features (Database, Analysis Services, Reporting Services and Integration Services) with their default settings on the following screen. It is the easiest way to install SQL Server and the one I will use in the tutorial. 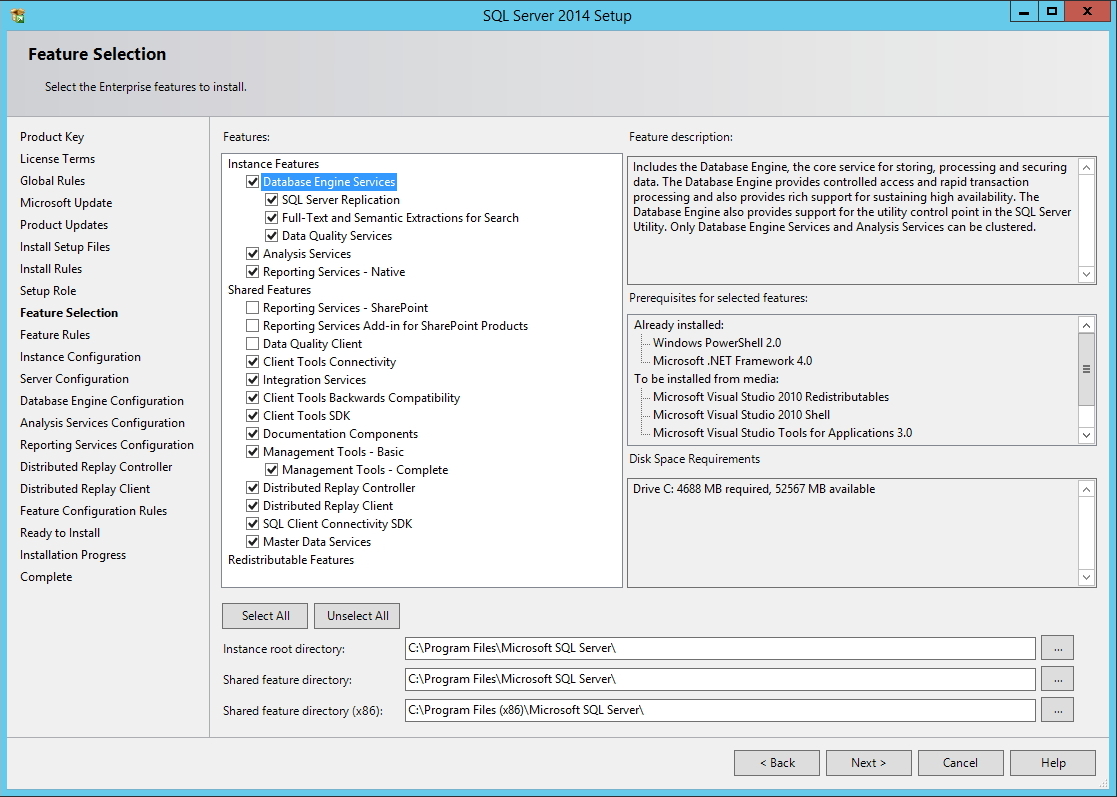
SQL Server - Components - Select the components you want to install, the installation path and click “Next”.
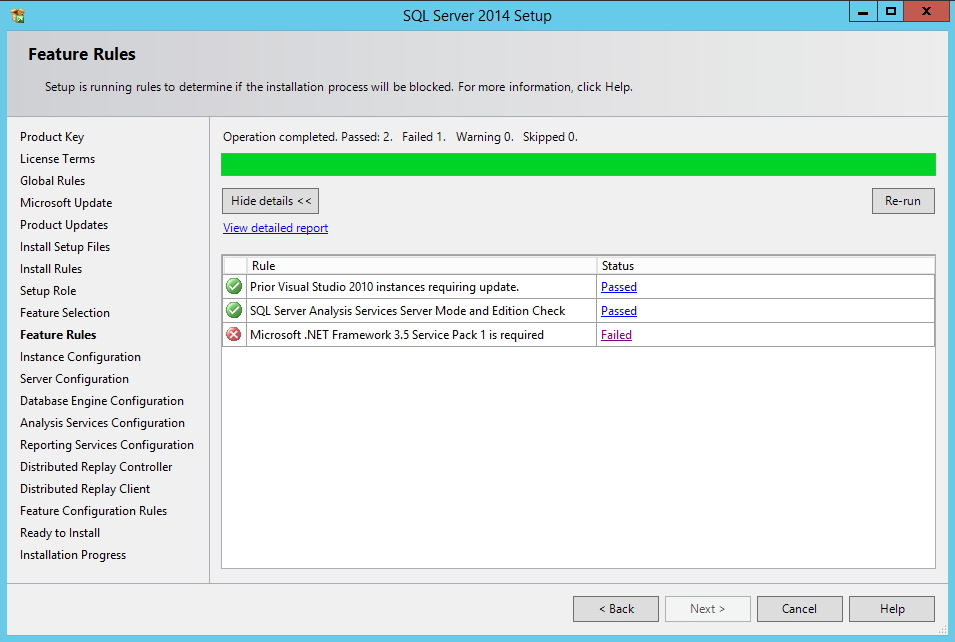
SQL Server - .NET Error - On this screen, the installation will check some more prerequisites to proceed with the installation.
- If the .NET Framework 3.5 Service Pack 1 step fails, as in my case, where I had just installed Windows Server, Download the installation file or enable .NET features if you are installing on Windows Server (Server Management > Adding Roles and Features logged in as ADMINISTRATOR). Install, restart the server for the installation to take effect and start the SQL Server installation again by repeating the previous steps.
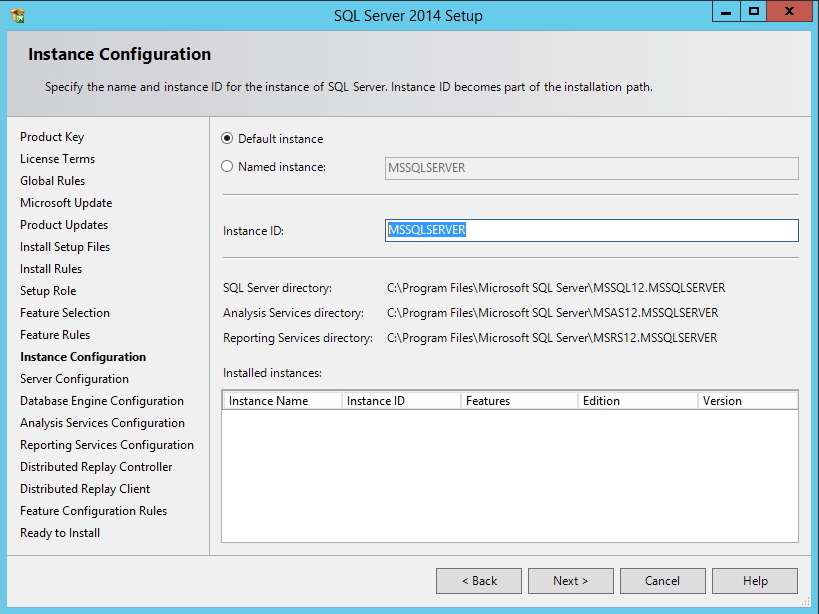
SQL Server - Instance Configuration - On this screen we can define the name of the instance to access SQL Server. By configuring the instance as the default “Default instance”, it will not be necessary to enter the instance name to connect to the SQL Server server. Otherwise, to connect to the database, you will have to enter the server and instance name. Ex: home_server\Test instance.
An instance, whether default or named, has its own set of program and data files, as well as a set of common files shared among all SQL Server instances on the computer. For this reason, even if you install SQL Server as the default instance, you MUST provide the instance ID.

SQL Server - Services Configuration - On this screen, we configure how SQL Server services are started (Automatic, Disabled or Manual). For those who only use the database, check mainly the SQL Server Agent services, which is responsible for the Jobs (automated routines) that are executed on the server and which is generally configured by default as Manual initialization and the SQL Server Database Engine, which is the database engine.
These two services must be configured as automatic startup, if you want the database to be automatically available when you turn on the server/computer.
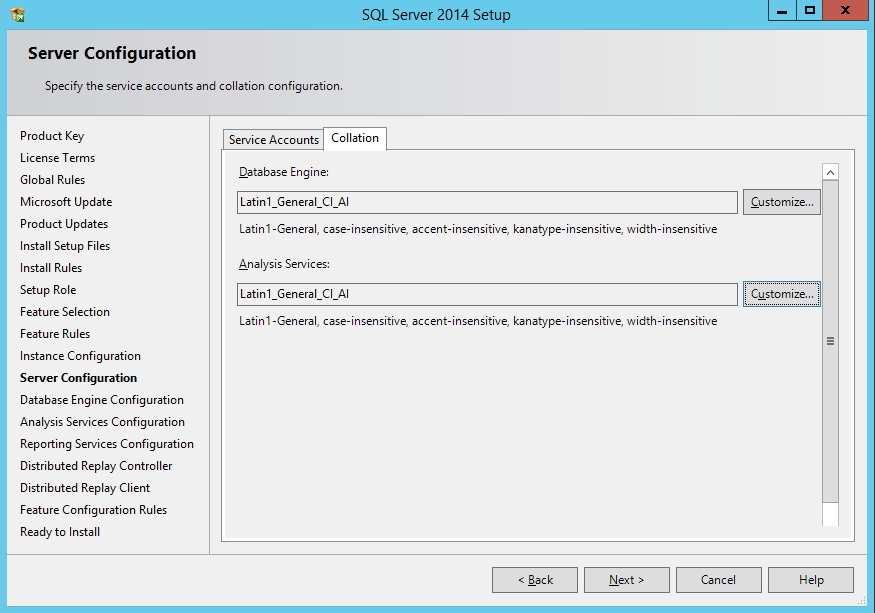
SQL Server - Collation Configuration - On this screen, we define the server's Collation, which is the input and output language for texts. This is where we define whether the bank will support accentuation, whether it will be case-sensitive (lowercase letters are different from uppercase letters. This is the default setting) or case-insensitive (uppercase and lowercase letters are interpreted by the bank as the same thing).
Note: The tables' Collation may be different from the collation of a specific column, which may also be different from the database's Collation. The database Collation is used to define the default collation of tables and columns when it is not specified. 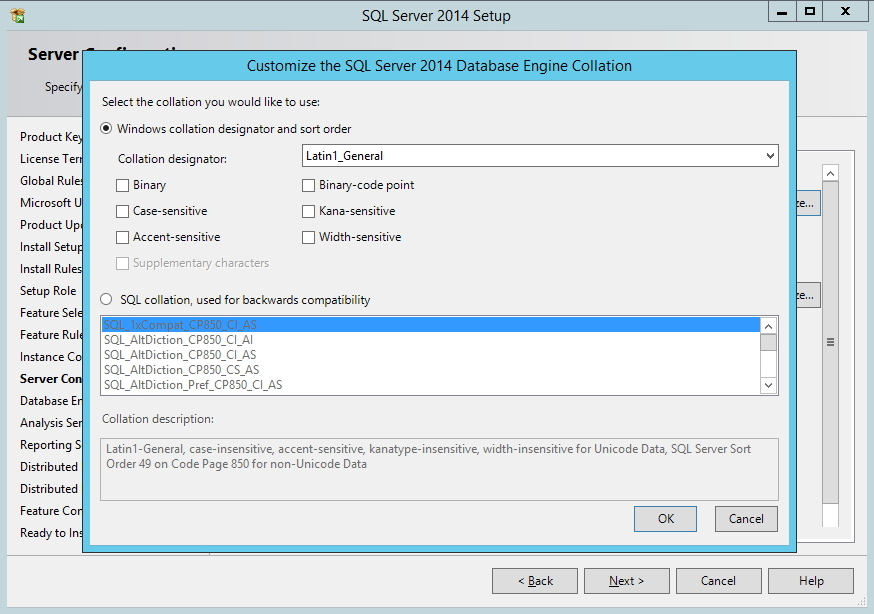
SQL Server - Collation Customization - By clicking on the “Customize” button (optional), we can customize the database collation according to our needs. Personally, I don't really like using the Case-Sensitive bench, despite it being a good practice, but it's a matter of taste.
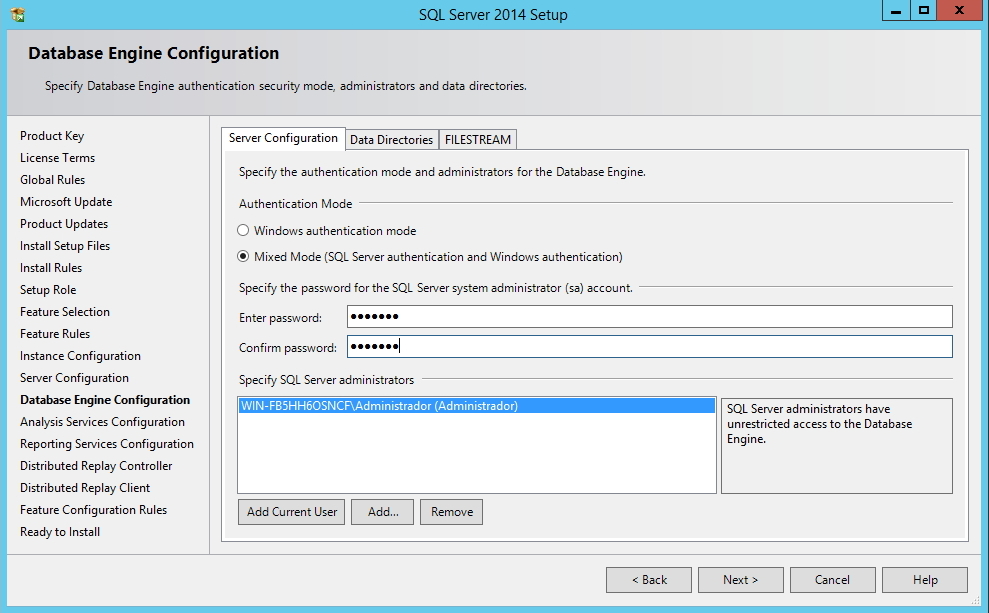
SQL Server - Configured database screen - On the next screen, we will configure the database engine. Here we define the database authentication mode and the AD users who will be administrators. To add the logged in user who is installing SQL Server, simply click on the “Add Current User” button.
The SQL Server authentication modes are:
– Windows authentication: Uses Active Directory to authenticate users and only allows users who are registered in AD. It is not necessary to enter a username and password.
– Mixed Mode: Allows both authentication using Active Directory and SQL Server authentication, where the login is created in the database and is accessed using username and password. It is the most common option, as most of the time, applications and systems do not use AD users, and the configuration within the application to use SQL Server users is much simpler. 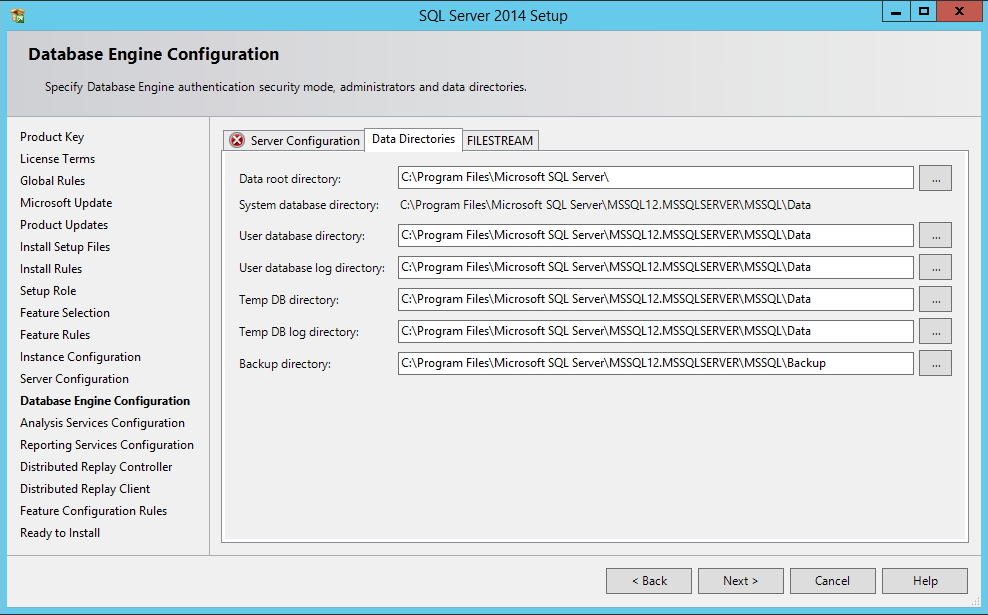
SQL Server - Database Directories - In the “Data Directories” tab, we can configure the directories where the system databases, the default Backup directory and the TempDB (data and log) and User (data and log) databases will be physically stored on the disk.
- In the “FILESTREAM” tab, it is possible to define whether this feature will be enabled in the database. FILESTREAM integrates SQL SERVER with the NTFS file system, storing objects of type (BLOB) with type varbinary(max) using the NTFS file system for this storage. It is possible through T-SQL to insert, delete, update and query and backup this data natively (I will later create a post about this and post it here xD).
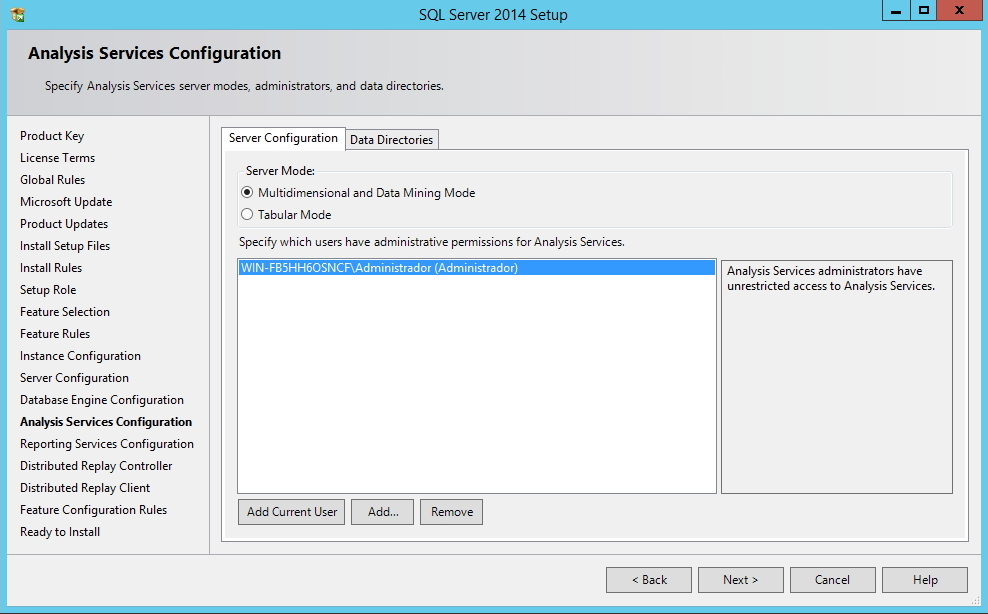
SQL Server - Analysis Services - Type - On the Analysis Services configuration screen, you can define the type of data modeling (Multidimensional – Standard Option) and the new Tabular mode, present since SQL Server 2012 (See the difference between the two here) and specify Analysis Services Administrator users.
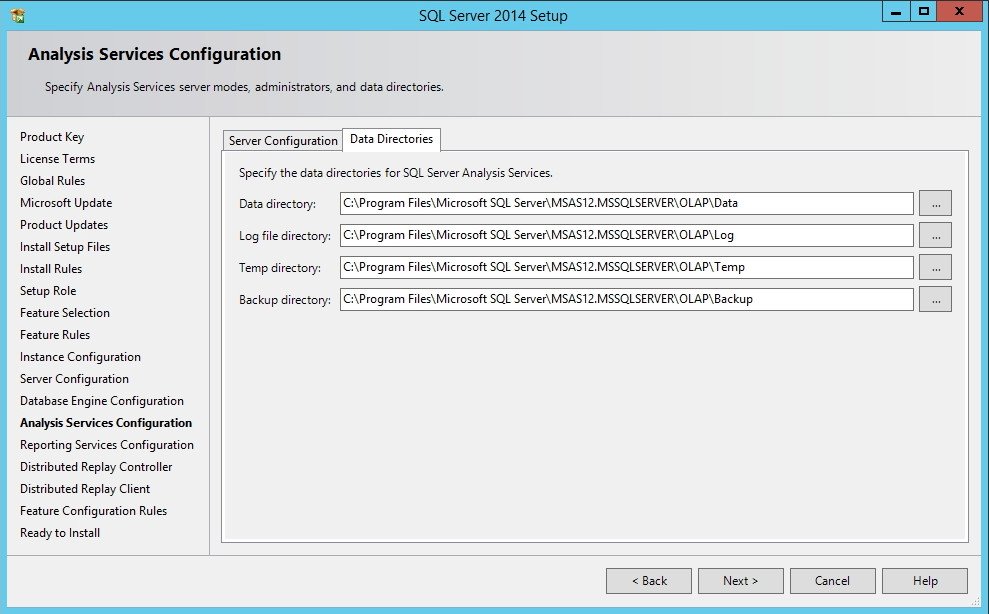
SQL Server - Analysis Services - Directories - Once again, SQL Server allows us to define the directories where Cube data, log files, the temporary directory and the default backup directory will be physically written to disk.
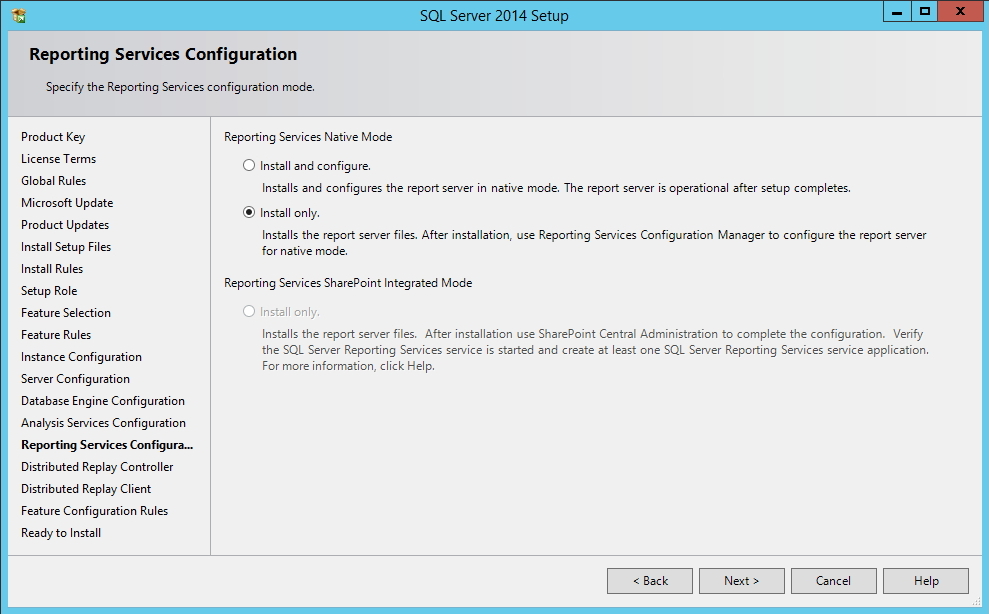
SQL Server - Reporting Services - On the Reporting Services configuration screen, we can select the first option to Install and configure the reporting tool or select the second option (which I did), where it will just be installed and configured later.

SQL Server - Distributed Replay Controller - Here we can define the Administrator users of the Distributed Replay Controller, the SQL Server impact testing and assessment and simulation tool, to complement SQL Server Profiler.
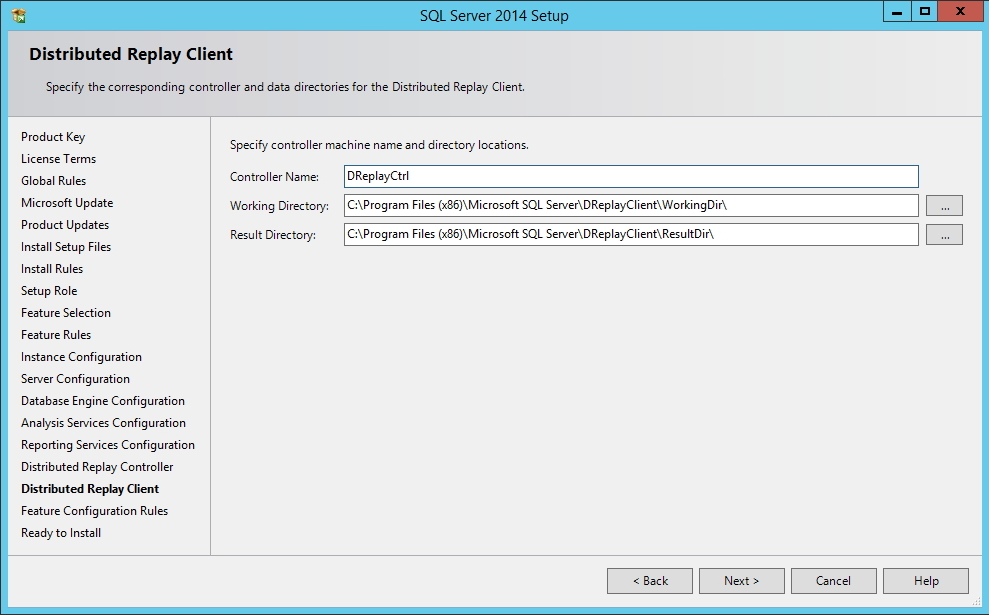
SQL Server - Distributed Replay Client - On this screen, we can define the name of the created Controller, the Distributed Display installation path and the default path where the evaluation results will be stored.
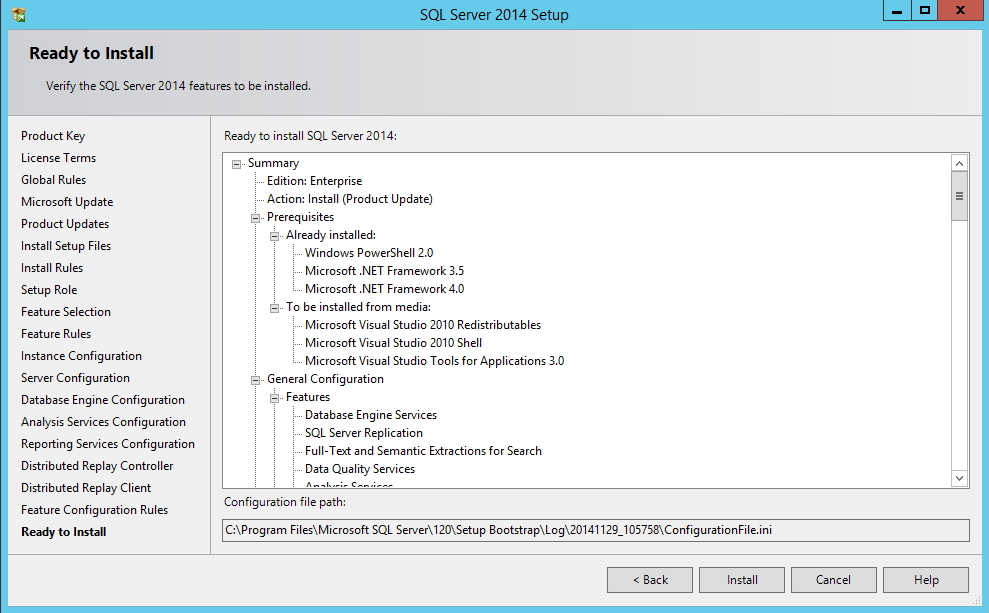
SQL Server - Installation Validation - In this last screen, we will just review everything that will be installed, what is already installed on the server and the configurations we made during installation. If everything is OK, click “Install” to start installing Microsoft SQL Server 2014.
- Please wait… Installation takes several minutes…
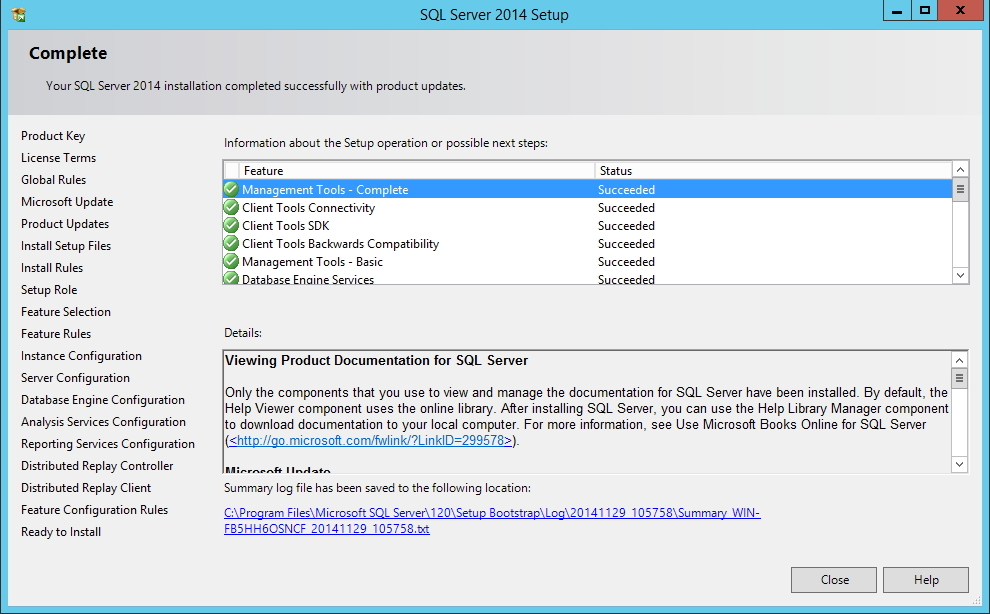
SQL Server - End of Installation - If everything went as expected, you should see this screen at the end of the installation process.
- READY! SQL Server 2014 installed!
Enabling remote connections
- Now that we have configured our server, we need to enable external connections to SQL Server, since in most cases, access is made from machines other than the server, as in my case, where the server is in the virtual machine and I access the database through Management Studio on the physical machine.
Although we have already enabled external connections during installation, our server's Firewall is probably blocking the ports necessary for SQL Server from another machine to access our server. To do this, I will explain below how to release these ports in the Firewall.
Freeing Firewall ports in Windows XP:
netsh firewall add portopening UDP 137 "NetBIOS UDP Porta 137"
netsh firewall add portopening UDP 138 "NetBIOS UDP Porta 138"
netsh firewall add portopening TCP 139 "NetBIOS TCP Porta 139"
netsh firewall set portopening protocol=TCP port=1433 name=SQLPort mode=ENABLE scope=SUBNET profile=CURRENT
Freeing Firewall ports on Windows Server 2008, 2012, Windows Vista, 7, 8 and above:
netsh advfirewall firewall add rule name="NetBIOS UDP Porta 137" dir=in action=allow protocol=UDP localport=137
netsh advfirewall firewall add rule name="NetBIOS UDP Porta 137" dir=out action=allow protocol=UDP localport=137

netsh advfirewall firewall add rule name="NetBIOS UDP Porta 138" dir=in action=allow protocol=UDP localport=138
netsh advfirewall firewall add rule name="NetBIOS UDP Porta 138" dir=out action=allow protocol=UDP localport=138

netsh advfirewall firewall add rule name="NetBIOS TCP Porta 139" dir=in action=allow protocol=TCP localport=139
netsh advfirewall firewall add rule name="NetBIOS TCP Porta 139" dir=out action=allow protocol=TCP localport=139

netsh advfirewall firewall add rule name="SQL Server Porta 1433" dir=in action=allow protocol=TCP localport=1433
netsh advfirewall firewall add rule name="SQL Server Porta 1433" dir=out action=allow protocol=TCP localport=1433
That's it folks,
Until next time!

Comments (0)
Loading comments...