
Hello everyone!
In the daily life of a PHP developer, it is very common to need a quick environment for testing, prototyping, or even hosting a low-traffic application. And often, we want something that is easy to set up, without the complexity of SSH Keys or advanced configurations right from the start.
With that in mind, Azure emerges as a powerful and accessible tool for creating virtual machines in just a few minutes!
In this post, we will demystify the process of creating a Virtual Machine on Azure with Debian 12 (Bookworm), the version available in Azure images, setting up a complete environment with Apache, PHP 8.5, and the drivers for connecting to SQL Server.
Furthermore, we will optimize performance and security with OPcache, UFW, fail2ban, and Cloudflare tips, including how to enable HTML page caching.
Get ready to have your web environment running in minutes, with everything you need to connect your PHP applications to SQL Server or MySQL/MariaDB, and with that touch of performance that makes all the difference. So, let's get started!
Creating the demo base on Azure
Creating a free Azure account
If you don't have an Azure account yet, great news: Microsoft offers a free account with USD 200 in credits to use in the first 30 days, plus over 55 free services for 12 months, more than enough for this tutorial.
To create your free account:
- Go to azure.microsoft.com/free and click on "Try free".
- Sign in with your Microsoft account (Outlook, Hotmail, Xbox) — or click "Create one" if you don't have one.
- Fill in your personal details: full name, country, and date of birth.
- Provide a phone number to receive the verification code.
- Provide a credit or debit card. It is required only to verify that you are a real person and does not generate automatic charges.
- Accept the terms and click "Sign up". In a few seconds, you will have access to the portal.
The card is used only for identity verification. You will not be charged as long as you stay within the free account limits and do not manually upgrade to a paid subscription. After the first 30 days, the USD 200 credits expire, but services marked as "free for 12 months" remain available at no cost.
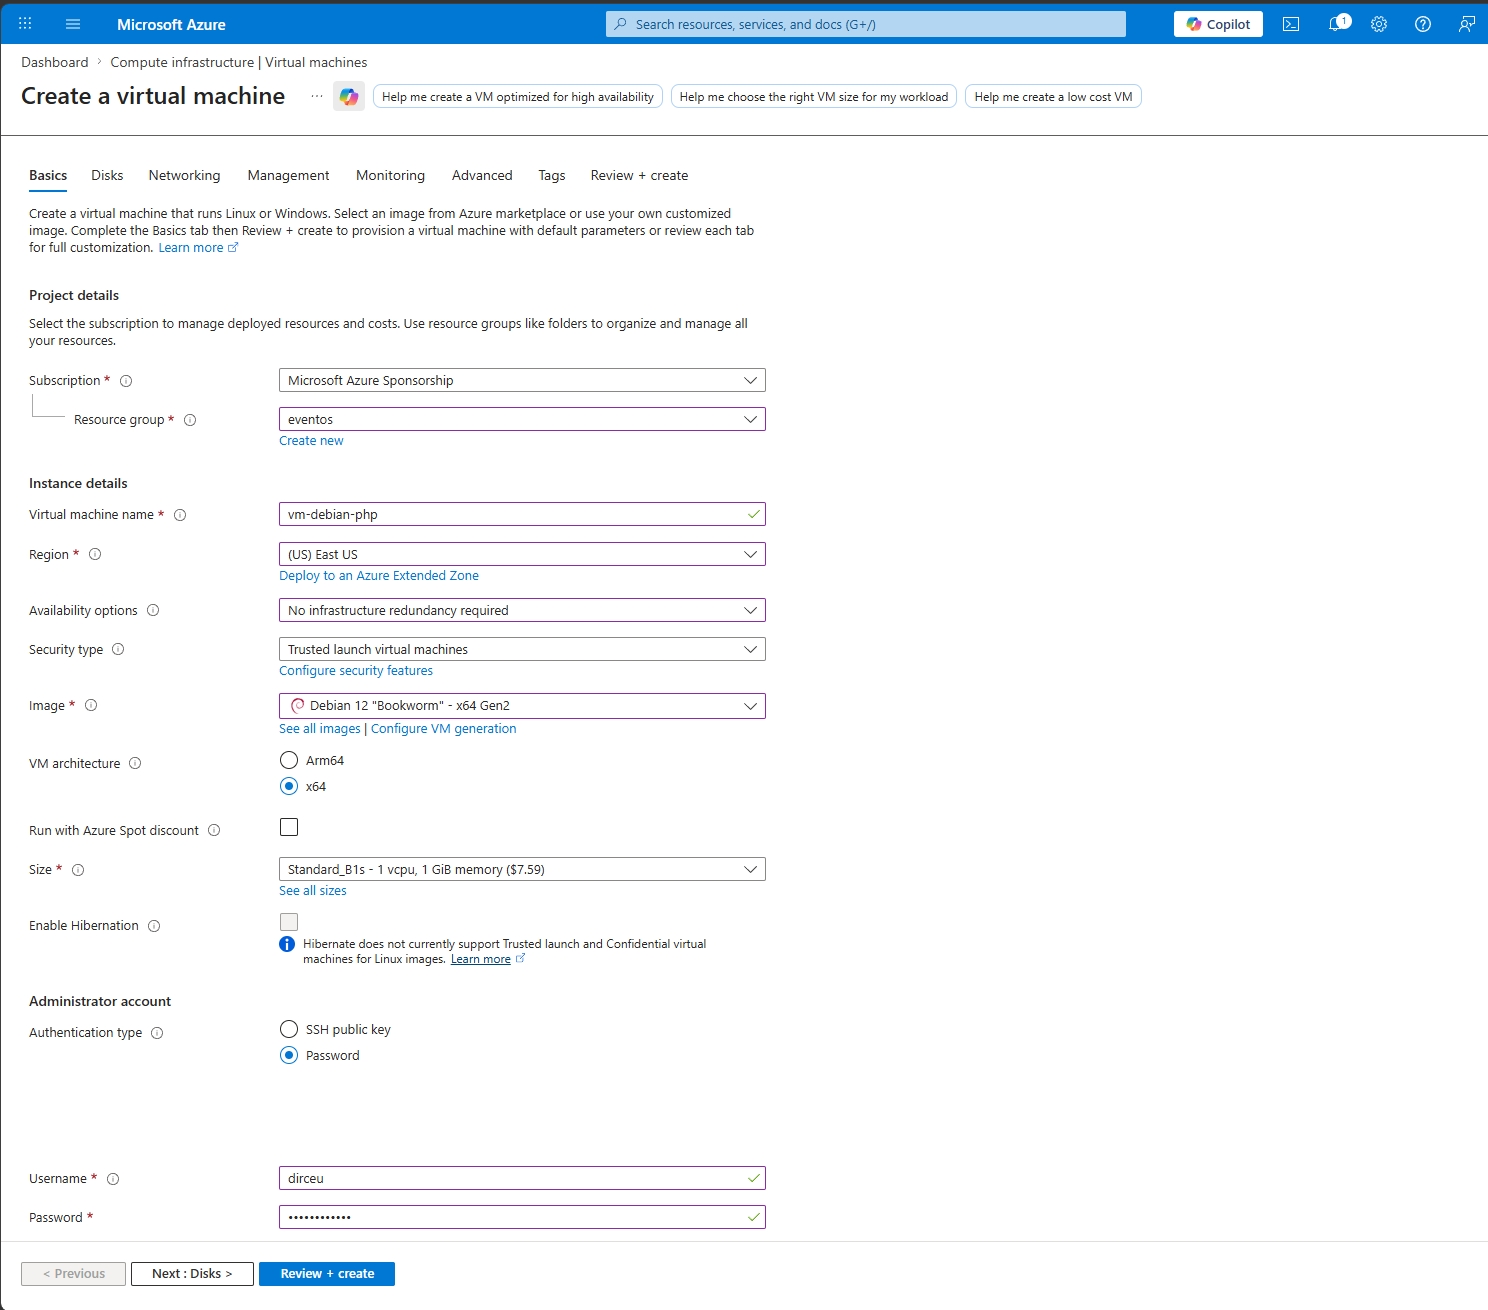
Creating the Virtual Machine on Azure
With your account created, go to portal.azure.com and follow the steps below to create your virtual machine:
- In the search bar, type "Virtual Machines" and select the option.
- Click "Create" and then "Azure virtual machine".
- Fill in the basic information:
- Subscription: Choose your subscription.
- Resource group: Create a new one (e.g.,
rg-webserver) or use an existing one. - Virtual machine name: A name that makes sense (e.g.,
vm-debian-web). - Region: Choose the region closest to you or your users.
- Availability options: Leave as "No infrastructure redundancy required".
- Security type: Leave as "Standard".
- Image: Search for and select "Debian 12 (Bookworm)".
- Size: Choose a size that meets your needs. For testing, a
Standard_B1s(1 vCPU, 1 GB RAM) is enough for small projects.
- Under "Administrator account", here is the trick for those who don't want complications with SSH Keys:
- Authentication type: Select "Password".
- Username: Create a username (e.g.,
dirceu). - Password: Create a strong password and write it down, as you will need it to access the VM.
- Under "Inbound port rules", select "Allow selected ports" and choose "HTTP (80)", "HTTPS (443)", and "SSH (22)". The SSH port is necessary for us to access the VM via terminal.
- Click "Review + create" and, after validation, "Create".
Wait a few minutes while Azure provisions your virtual machine. Once it's ready, you will have a public IP to access it. Write down this IP!
Configuring a static public IP
By default, Azure assigns a dynamic public IP to the VM, which means it changes every time the VM is restarted. When this happens, you lose SSH access, the Cloudflare DNS keeps pointing to the wrong IP, and you have to update everything again. Therefore, the first step is to make the IP static.
- On your VM page in Azure, click on the Public IP name that appears in the overview panel (something like
vm-debian-web-ip). - In the side menu, click on "Configuration".
- Under "Assignment", change from "Dynamic" to "Static".
- Click "Save".
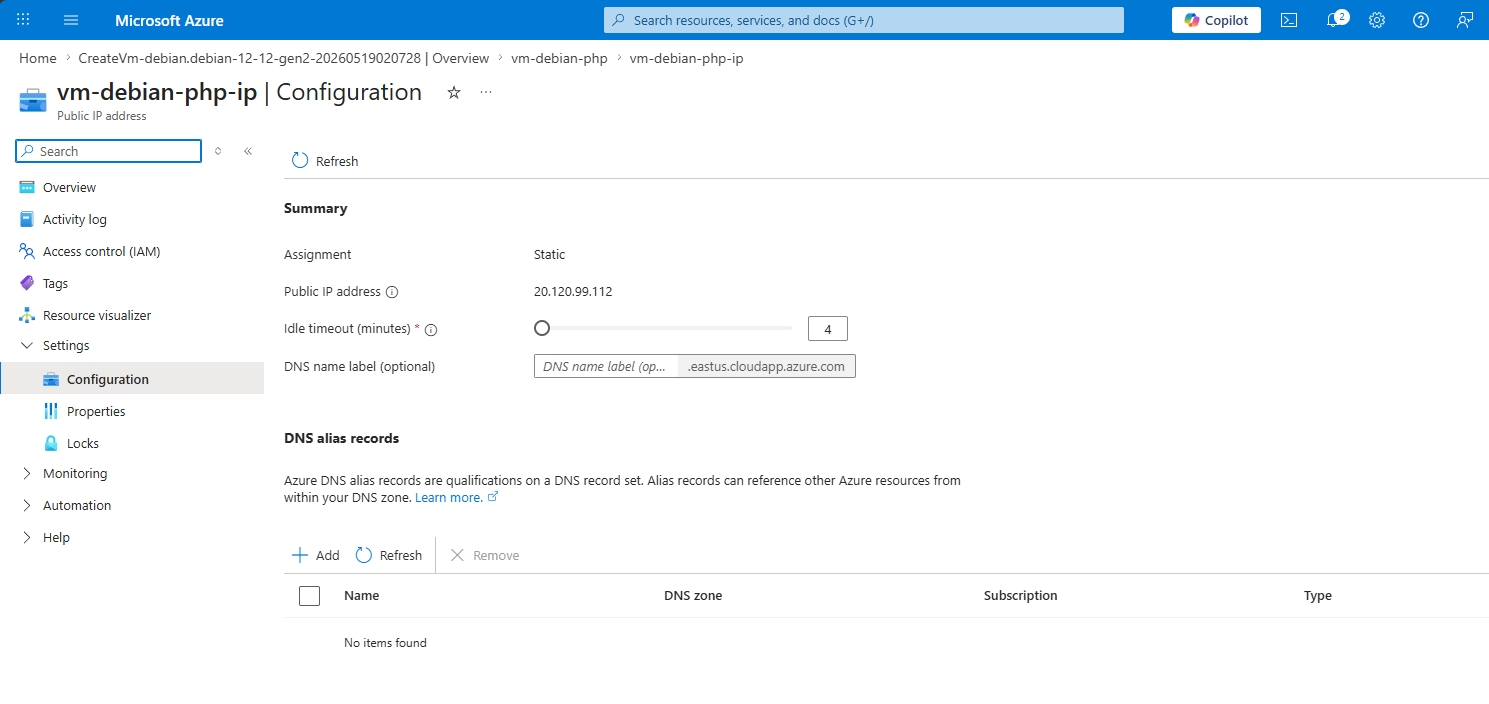
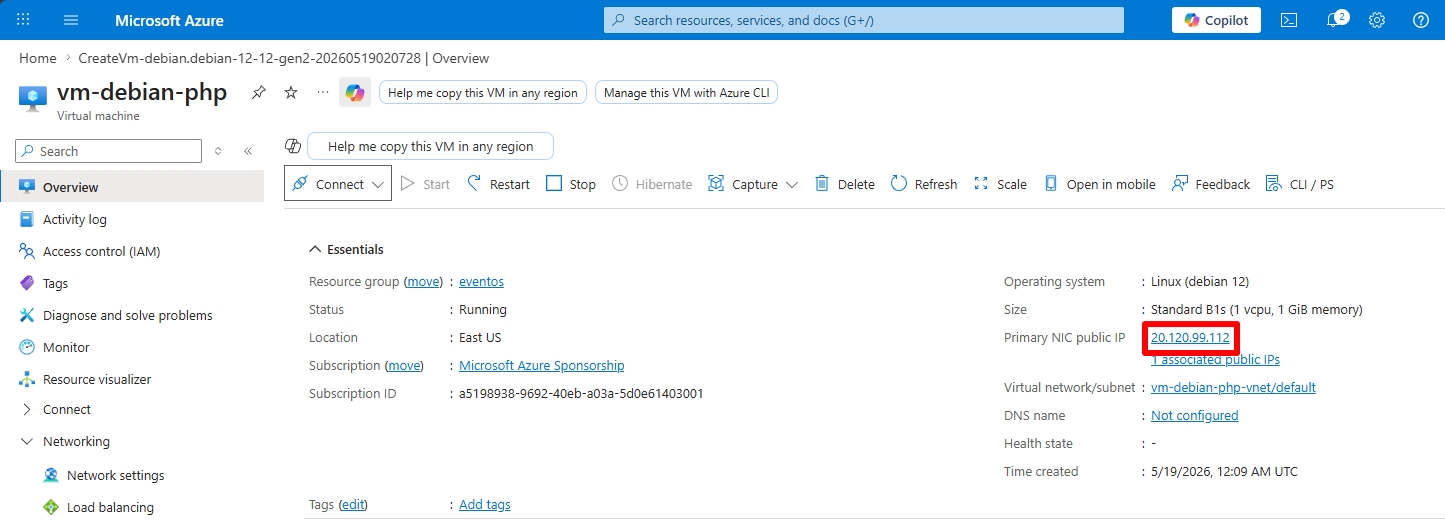
The IP that appears on the screen now is permanent and will not change even if you restart, shut down, or resize the VM. Write down this IP, as you will use it in the NSG, Cloudflare DNS, and FileZilla/PuTTY settings.
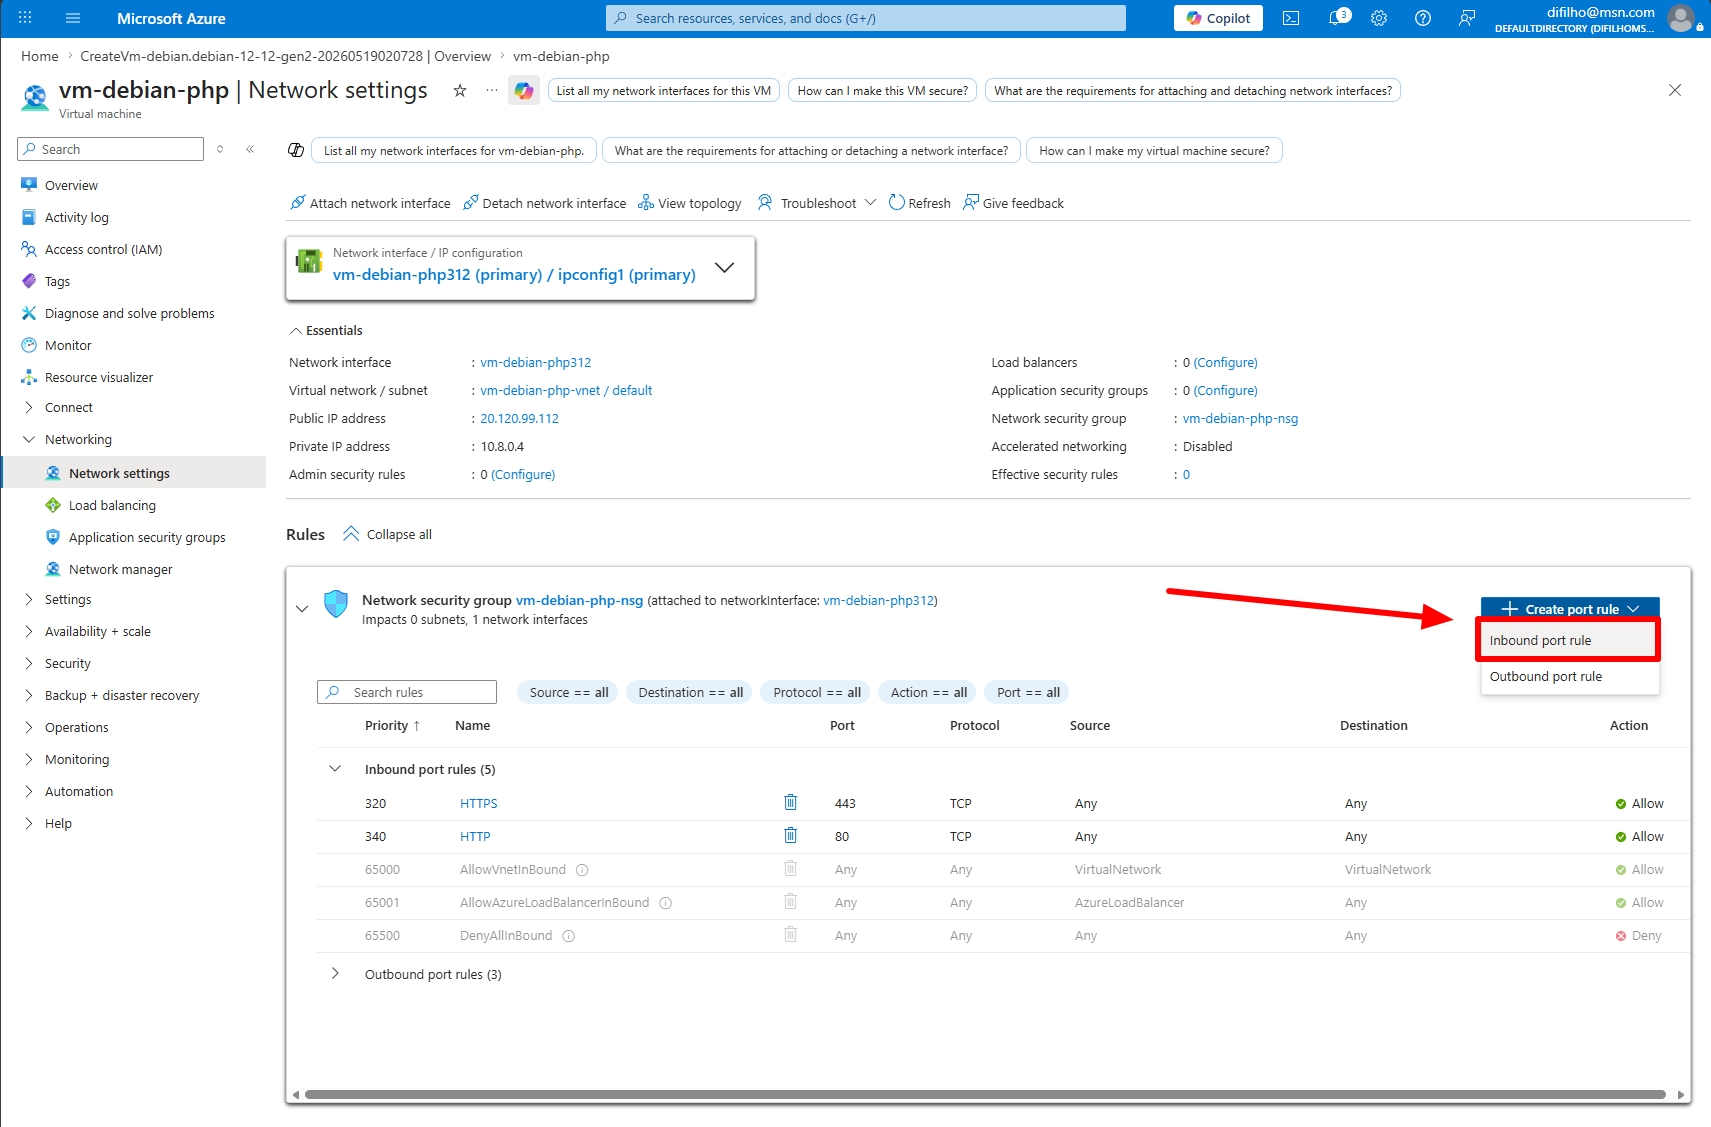
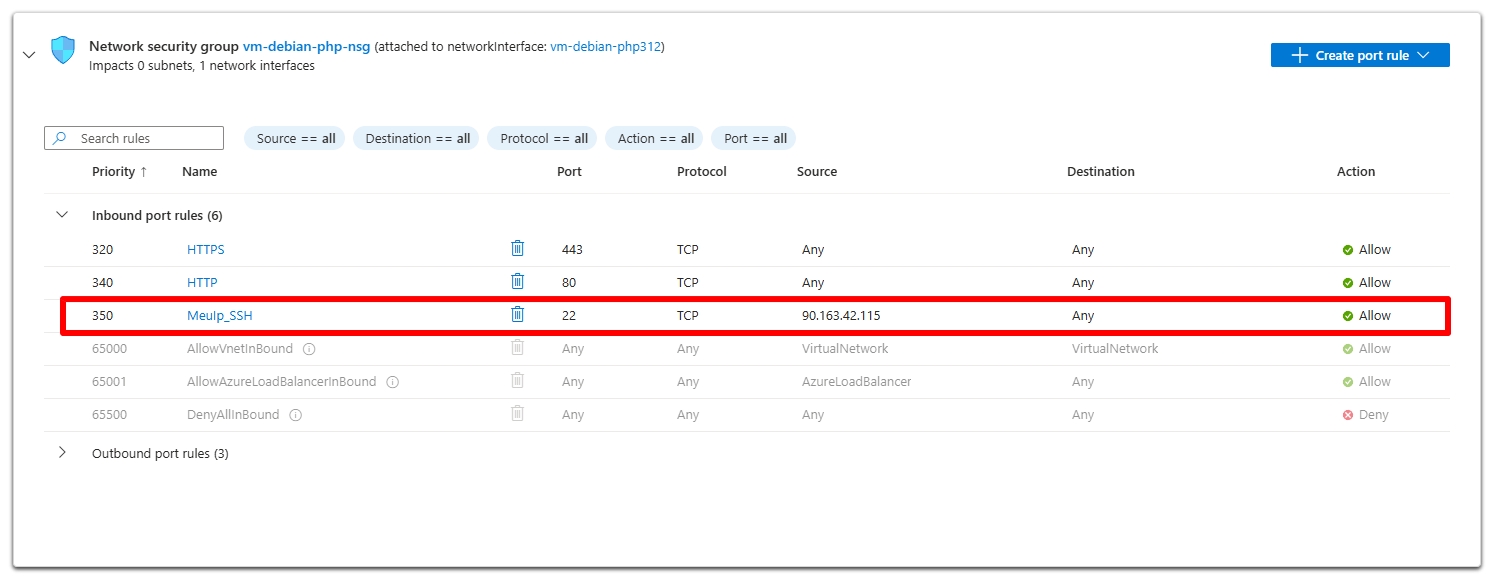
Allowing SSH access in the NSG (Network Security Group)
Before connecting to the VM, it's worth checking if the NSG (Network Security Group), Azure's network firewall, is allowing SSH connections from your IP. The NSG is created along with the VM, but the SSH rule might be open to any IP in the world, which is a security risk, or it might not even exist.
The recommendation is to restrict SSH only to your IP. Here is how:
1. Find your current public IP
Before touching the NSG, you need to know your current public IP, which is the IP that Azure will "see" when you try to connect. Visit one of the sites below and write down the IPv4:
If your internet provider uses a dynamic IP (which is the case for most residential connections), your IP may change periodically. Whenever you lose SSH access, check if your IP has changed and update the rule in the NSG.
2. Access the NSG in the Azure portal
- In portal.azure.com, access your VM and, in the left side menu, click on "Networking".
- Click on the NSG name displayed next to "Network security group" — usually something like
vm-debian-web-nsg. - In the NSG side menu, click on "Inbound security rules".
3. Edit (or create) the SSH rule
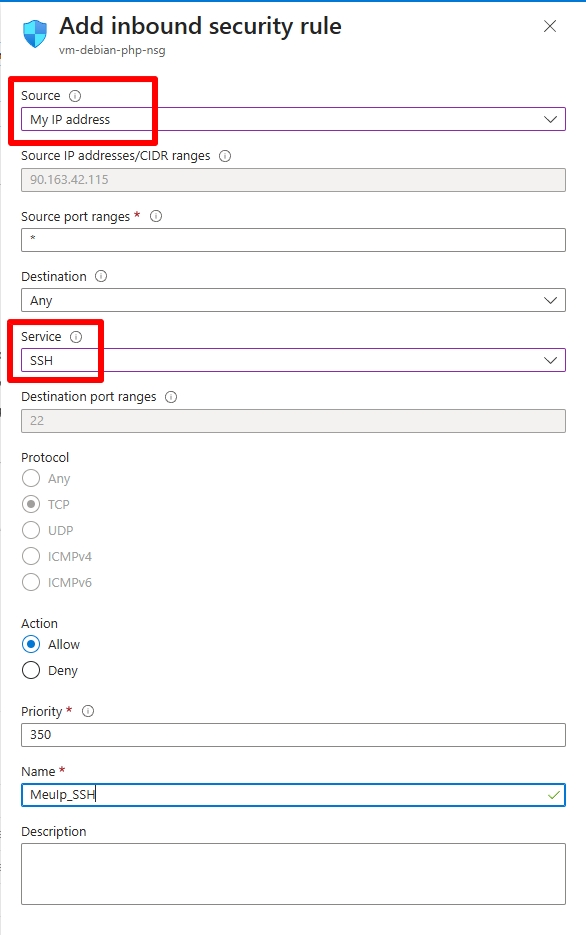
Look for an existing rule with destination port 22 and TCP protocol. If it exists and the source is Any or *, click it to edit. If it doesn't exist, click "+ Add" to create a new one.
Fill in the fields:
- Source: select "IP Addresses"
- Source IP addresses/CIDR ranges: paste your public IP followed by
/32(e.g.,177.90.45.123/32). The/32means "only this specific IP". - Destination port ranges:
22 - Protocol: TCP
- Action: Allow
- Priority: a low number (e.g.,
300) ensures this rule is evaluated before more generic ones. - Name: something descriptive, like
Allow-SSH-MyIP.
Click "Save". The rule takes effect in a few seconds.
If your company or school uses a corporate network with NAT, you may need to allow an IP range instead of a single address. In that case, consult your network administrator to get the correct CIDR block (e.g., 200.155.10.0/24).
Never leave SSH open to the world
Avoid keeping the SSH rule with source Any (0.0.0.0/0). Servers with SSH exposed to the internet receive automated brute-force intrusion attempts within minutes after creation. Restricting it to your IP eliminates practically 100% of these attempts.
Accessing the VM via SSH
With the VM created and the public IP in hand (you can find it on the VM details page in Azure, under "Public IP"), it's time to connect to it. The connection is via SSH, a protocol that encrypts all communication with the server. The options depend on your operating system:
Option 1: PuTTY (recommended for Windows beginners)
PuTTY is a free SSH client with a graphical interface, very popular among Windows users. To install it and connect:
- Go to chiark.greenend.org.uk/~sgtatham/putty/latest.html and download the
putty-64bit-X.XX-installer.msiinstaller. - Run the installer and click "Next" until finished.
- Open PuTTY. In the "Host Name (or IP address)" field, paste your VM's public IP from Azure.
- Confirm that the port is 22 and the connection type is SSH.
- Tip: in the "Saved Sessions" field, give the connection a name (e.g.,
vm-azure) and click "Save" — this way you don't need to type the IP every time. - Click "Open".
- On the first connection, PuTTY displays a warning about the server key — click "Accept". This is normal and expected.
- In the black window that opens, type your username (the one you created in Azure) and press Enter.
- Type your password — the characters do not appear on the screen while you type, this is intentional — and press Enter.
You are inside the VM! The terminal will display something like your_user@vm-debian-web:~$, confirming the successful connection.
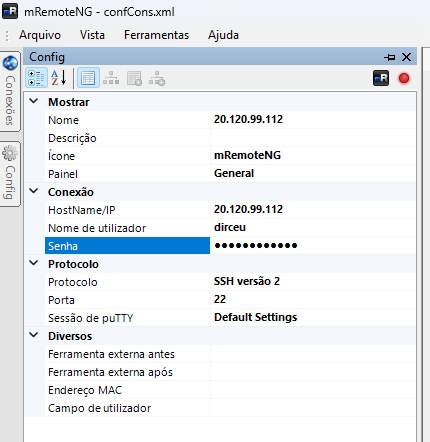
If you are using mRemoteNG, the connection screen will look like this:
Option 2: Native terminal (Linux, macOS, or Windows 10+)
On Linux, macOS, and Windows 10/11 (PowerShell or Windows Terminal), SSH is already available without needing to install anything. Open the terminal and run:
ssh seu_usuario@IP_PUBLICO_DA_VMOn the first connection, confirm with yes when asked about the host's authenticity. Then, enter your password. Once connected, let's get started!
Preparing the system
With the connection established, elevate privileges to the root user to facilitate installations:
sudo suNext, update the repositories to ensure we are installing the latest versions of the packages:
apt-get updateResult: Your environment is ready to receive the software we need.
Installing and Configuring Apache
Now we will install the Apache web server and some important dependencies for PHP and other features.
Use the script below:
# Install Apache and dependencies
apt-get --yes install build-essential autoconf flex bison
apt-get --yes install apache2 apache2-dev libapache2-mod-evasive apache2-utils
apt-get --yes install libpng-dev
apt-get --yes install zlib1g zlib1g-dev libxml2 libxml2-dev
apt-get --yes install openssl libssl-dev
apt-get --yes install libgd-dev
apt-get --yes install vim curl libcurl4 libcurl4-openssl-dev
apt-get --yes install libfreetype6-dev libreadline-dev sqlite3
apt-get --yes install rpl zip libzip-dev libbz2-dev unzip libldap2-dev pwgen
apt-get --yes install unixodbc unixodbc-dev s3cmd
Packages removed in Debian 12
The packages libssl1.1, libmcrypt-dev, libmcrypt4, mcrypt, libgdchart-gd2-xpm, and libaio1 do not exist in Debian 12 (Bookworm) and will cause installation errors. OpenSSL 3.x is already covered by libssl-dev included in the list above.
Result: Apache and its essential dependencies are installed. You can now access your VM's public IP in the browser and you will see the default Apache page ("Apache2 Debian Default Page").
Enabling .htaccess and Modules
For Apache to work correctly with PHP applications like WordPress, we need to enable the use of .htaccess files and some important modules.
To enable .htaccess and increase the request line limit:
# Enable htaccess and symbolic links
rpl -e "\n\tOptions Indexes FollowSymLinks\n\tAllowOverride None" \
       "\n\tOptions FollowSymLinks\n\tAllowOverride All" \
       /etc/apache2/apache2.conf

echo "LimitRequestLine 100000" >> /etc/apache2/apache2.conf
The rpl command is a tool for text replacement in files, similar to sed, but with a friendlier syntax. It replaces the default Apache configuration to allow AllowOverride All, which enables .htaccess.
Now, let's enable the Apache modules that are crucial for performance and URL rewriting:
# Enable Apache modules
a2dismod mpm_event
a2dismod mpm_worker
a2enmod mpm_prefork
a2enmod rewrite
a2enmod headers
Result: Apache is configured to use the mpm_prefork module (necessary to work with mod_php), and the rewrite and header modules are active, allowing friendly URLs and HTTP header manipulation.
Installing and Configuring PHP 8.5
It is time to install PHP! We will use version 8.5, released in November 2025, which is the latest version and brings performance improvements and new features compared to previous versions. To do this, we will add the package repository from Ondřej Surý, who maintains updated PHP versions for Debian/Ubuntu.
First, add the GPG key and the repository:
# Add PHP repository (Ondřej Surý) — modern method without apt-key
apt install apt-transport-https lsb-release ca-certificates curl gnupg -y

curl -sSLo /usr/share/keyrings/deb.sury.org-php.gpg https://packages.sury.org/php/apt.gpg
echo "deb [signed-by=/usr/share/keyrings/deb.sury.org-php.gpg] https://packages.sury.org/php/ $(lsb_release -sc) main" \
    | tee /etc/apt/sources.list.d/php.list

apt update
The signed-by method is the current and recommended way to add external repositories on Debian/Ubuntu. The old apt-key add has been marked as deprecated and will be removed in future versions of APT.
Now install PHP 8.5 and the necessary extensions:
# Install PHP 8.5 and extensions
apt install php8.5 php8.5-cli php8.5-{bz2,curl,mbstring,intl,xml,gd,zip,mysql,opcache,readline} -y
apt install php-pear wget git php-cgi php-common php-net-socket -y
In addition to the basic extensions, we have already installed php8.5-opcache. OPcache is a native PHP bytecode accelerator that stores compiled code in memory, eliminating the need to recompile scripts on every request. In real PHP applications, the performance gain is usually between 3x and 5x, and it comes built into PHP at no extra cost.
With OPcache installed, let's configure it optimally. Run the command below to create or replace the configuration file at once, without needing to open a text editor:
cat > /etc/php/8.5/mods-available/opcache.ini << 'EOF'
zend_extension=opcache.so
opcache.enable=1
opcache.memory_consumption=256
opcache.interned_strings_buffer=16
opcache.max_accelerated_files=10000
opcache.revalidate_freq=60
opcache.fast_shutdown=1
opcache.enable_cli=0
EOF
Now, let's integrate PHP 8.5 with Apache using the mod_php module:
# Install mod_php for Apache
apt install libapache2-mod-php8.5 -y
a2enmod php8.5

# Restart Apache to load the module
systemctl restart apache2
Result: PHP 8.5 is installed and configured to work with Apache. Your PHP applications can now be executed!
To verify the PHP version and loaded modules, you can use:
php -v
php -m
Result: You will see the PHP 8.5 version and a list of all active modules, including OPcache.
Connecting PHP to SQL Server (ODBC)
This is the icing on the cake for those who work with SQL Server! We will install Microsoft's ODBC drivers so that PHP can communicate with SQL Server, whether it is on Azure, on-premises, or on another server.
Attention: correct repository for Debian
Microsoft's ODBC drivers have specific repositories for each distribution. Always use the repository for Debian — never the Ubuntu one — to avoid package incompatibilities and silent installation failures.
To install the ODBC drivers:
# Add GPG key and Microsoft repository for Debian
curl -fsSL https://packages.microsoft.com/keys/microsoft.asc \
    | gpg --dearmor -o /usr/share/keyrings/microsoft-prod.gpg

curl -s https://packages.microsoft.com/config/debian/12/prod.list \
    | tee /etc/apt/sources.list.d/mssql-release.list

apt-get update

# Install ODBC drivers and command-line tools
ACCEPT_EULA=Y apt-get -y install msodbcsql18 mssql-tools18

# Add tools to PATH
echo 'export PATH="$PATH:/opt/mssql-tools18/bin"' >> ~/.bashrc
source ~/.bashrc

# Install build dependencies for PECL (PHP 8.5 headers + XML extension)
apt install php8.5-dev php8.5-xml -y

# Install PHP extensions for SQL Server via PECL
# PHP_PEAR_PHP_BIN ensures pecl uses PHP 8.5, not the system default PHP
export PHP_PEAR_PHP_BIN=/usr/bin/php8.5
pecl channel-update pecl.php.net
pecl install sqlsrv
pecl install pdo_sqlsrv
The php8.5-dev package provides the compilation headers necessary for PECL to build native extensions. php8.5-xml is required for PEAR itself to work. The PHP_PEAR_PHP_BIN variable instructs PECL to specifically use PHP 8.5 as the compilation base. Without it, PECL uses the system's default PHP (which might be a different version) and fails with the error "XML Extension not found".
Enabling drivers in PHP.ini
After installing the drivers via PECL, we need to tell PHP that they should be loaded. On Debian with Ondřej Surý's repository, the correct way is to create the files in mods-available and use phpenmod, which enables the extension for all SAPIs (CLI, Apache, FPM) at once.
# Create extension configuration files
echo "extension=sqlsrv.so"     > /etc/php/8.5/mods-available/sqlsrv.ini
echo "extension=pdo_sqlsrv.so" > /etc/php/8.5/mods-available/pdo_sqlsrv.ini

# Enable for all PHP 8.5 SAPIs (creates symlinks in cli/conf.d, apache2/conf.d, etc.)
phpenmod -v 8.5 sqlsrv pdo_sqlsrv
phpenmod is the native Debian tool for activating PHP extensions. It automatically creates symlinks in the conf.d directories of each installed SAPI (CLI, Apache, FPM), without needing to find the path manually. It is equivalent to a2enmod, but for PHP extensions.
For the changes to take effect, restart Apache:
systemctl restart apache2Result: Your PHP is now ready to connect to SQL Server! To confirm, create a /var/www/html/phpinfo.php file with the content <?php phpinfo(); ?> and access it in your browser. Verify that the sqlsrv, pdo_sqlsrv, and opcache sections are listed.
Security: After validating the installation, immediately remove the phpinfo.php file from the server. This file exposes sensitive information about the environment (PHP version, modules, configurations, paths) and should not remain publicly accessible.
Testing the PHP → SQL Server connection
In addition to phpinfo(), it is worth performing a real connection test. Create the file below (replace the connection details with your own):
nano /var/www/html/test-sqlsrv.php<?php
$servidor = 'SEU_SERVIDOR.database.windows.net'; // or SQL Server IP
$usuario = 'seu_login';
$senha = 'SuaSenha@123';
$banco = 'seu_banco';
$conn = sqlsrv_connect($servidor, [
'Database' => $banco,
'UID' => $usuario,
'PWD' => $senha,
'TrustServerCertificate' => true,
]);
if ($conn === false) {
echo '<h2>ERRO na conexão:</h2><pre>';
print_r(sqlsrv_errors());
echo '</pre>';
} else {
echo '<h2>✅ Conexão bem-sucedida!</h2>';
$result = sqlsrv_query($conn, 'SELECT @@VERSION AS versao');
$row = sqlsrv_fetch_array($result, SQLSRV_FETCH_ASSOC);
echo '<p>' . htmlspecialchars($row['versao']) . '</p>';
sqlsrv_close($conn);
}
?>Access http://VM_IP/test-sqlsrv.php in your browser. If the green ✅ message appears with the SQL Server version, the connection is working!
Just like phpinfo.php, remove this file immediately after testing. It contains credentials and should not remain publicly exposed.
rm /var/www/html/test-sqlsrv.phpPermissions and Basic Security Settings
Permissions are crucial for the security and proper functioning of applications. Let's adjust some of them and install useful tools.
# Add your user to the www-data group to manage Apache files
# Replace 'your_user' with the username you created on the VM
usermod -a -G www-data seu_usuario

# Update and clean up unnecessary packages
apt-get update
apt-get upgrade -y
apt autoremove -y

# Install useful tools
apt-get install htop ncdu -y
Attention
Remember to replace your_user with the username you created when provisioning the VM on Azure. Adding the user to the www-data group allows you to manage files in the Apache folder without needing to use sudo for every operation. Avoid adding your user to the root group — this represents an unnecessary security risk.
Firewall with UFW
A good security practice is to configure the VM's firewall directly in the operating system, in addition to Azure rules. UFW (Uncomplicated Firewall) makes this task much easier:
# Install and configure UFW
apt-get install ufw -y

# Set default policy: deny incoming, allow outgoing
ufw default deny incoming
ufw default allow outgoing

# Allow necessary ports
ufw allow ssh      # port 22
ufw allow http     # port 80
ufw allow https    # port 443

# Enable the firewall
ufw enable

# Check status
ufw status verbose
Attention
Make sure to allow the SSH port (ufw allow ssh) before enabling UFW. Otherwise, you will lose remote access to the VM.
Brute-force protection with fail2ban
fail2ban monitors system logs and automatically blocks IPs that make too many failed login attempts via SSH. It is an extra layer of defense, especially useful if you need to allow SSH for more than one IP (home, work...).
# Install fail2ban
apt-get install fail2ban -y

# Create local configuration file (never edit the original .conf)
cp /etc/fail2ban/jail.conf /etc/fail2ban/jail.local
Edit the local file to adjust SSH settings:
nano /etc/fail2ban/jail.localLocate the [sshd] section and adjust the values:
[sshd]
enabled  = true
port     = ssh
logpath  = %(sshd_log)s
backend  = %(sshd_backend)s
maxretry = 5
bantime  = 3600
findtime = 600
What each directive does:
maxretry = 5: blocks the IP after 5 failed login attemptsfindtime = 600: the 5 attempts must occur within 10 minutesbantime = 3600: the IP is blocked for 1 hour (use-1for permanent blocking)
# Enable and start the service
systemctl enable fail2ban
systemctl start fail2ban

# Check status and banned IPs
fail2ban-client status sshd
If you yourself enter the wrong password more than 5 times in a row, you might ban your own IP. In that case, use the Azure Serial Console (available in the portal, under Support + Troubleshooting → Serial Console) to access the VM without SSH and run fail2ban-client set sshd unbanip YOUR_IP.
SSL/HTTPS Certificate with Certbot
To have a secure site with HTTPS, we will install Certbot, which automates obtaining and renewing free SSL certificates from Let's Encrypt.
# Install Certbot for Apache
apt install certbot python3-certbot-apache -y

# Obtain certificate (replace with your actual domain)
certbot --apache -d seudominio.com.br -d www.seudominio.com.br
Result: Your site can now be configured to use HTTPS, ensuring secure communication with your users. Certbot also configures automatic certificate renewal.
Configuring VirtualHost for your domain
Up to this point, all content stays inside /var/www/html/. This works for a single site, but Apache has a better way to organize this: VirtualHost, which associates a domain with a specific folder. Certbot also needs a configured VirtualHost to generate the SSL certificate correctly.
# Create site folder (replace 'yourdomain.com.br' with your domain)
mkdir -p /var/www/seudominio.com.br/public
chown -R seu_usuario:www-data /var/www/seudominio.com.br

# Create VirtualHost configuration file
nano /etc/apache2/sites-available/seudominio.com.br.conf
Fill the file with the content below (replace the domain and email):
<VirtualHost *:80>
    ServerName  seudominio.com.br
    ServerAlias www.seudominio.com.br
    ServerAdmin [email protected]

    DocumentRoot /var/www/seudominio.com.br/public

    <Directory /var/www/seudominio.com.br/public>
        Options FollowSymLinks
        AllowOverride All
        Require all granted
    </Directory>

    ErrorLog  ${APACHE_LOG_DIR}/seudominio-error.log
    CustomLog ${APACHE_LOG_DIR}/seudominio-access.log combined
</VirtualHost>
Save and exit: Ctrl+O → Enter → Ctrl+X. Now, enable the VirtualHost and reload Apache:
# Enable the new VirtualHost
a2ensite seudominio.com.br.conf

# Test configuration before reloading
apache2ctl configtest

# Reload (without dropping active connections)
systemctl reload apache2
Result: Apache now serves the content from /var/www/yourdomain.com.br/public/ when someone accesses http://yourdomain.com.br. Place your PHP files in this folder (via FileZilla) and Certbot will automatically use this VirtualHost when generating the SSL certificate.
Optional: Installing MariaDB and WordPress
If you need a local database or want to test WordPress, follow these steps. Remember that you can use a managed database service on Azure (like Azure Database for MySQL) or a SQL Server elsewhere.
Installing MariaDB
# Install MariaDB server and client
apt-get install mariadb-server mariadb-client -y

# Start and enable the service
systemctl start mariadb
systemctl enable mariadb

# Run initial secure configuration
mysql_secure_installation
During mysql_secure_installation, you will be guided to set a password for the MariaDB root user, remove anonymous users, disable remote root login, and remove the test database. Follow the recommended instructions.
To create a database and user for WordPress (or your application), access MariaDB and run the commands below:
mysql -u root -p-- Create database
CREATE DATABASE wordpressdb CHARACTER SET utf8mb4 COLLATE utf8mb4_unicode_ci;
-- Create user (correct syntax for MariaDB 10.4+)
CREATE USER 'wordpressuser'@'localhost' IDENTIFIED BY 'SuaSenhaForte@2024';
GRANT ALL PRIVILEGES ON wordpressdb.* TO 'wordpressuser'@'localhost';
FLUSH PRIVILEGES;
QUIT;Attention
The GRANT ... IDENTIFIED BY syntax was removed in MariaDB 10.4+. Always create the user with CREATE USER separately before running GRANT. Also, replace YourStrongPassword@2024 with a unique and secure password — never use generic passwords in production.
Result: You have a MariaDB server running and a database ready for your application.
Installing WordPress
# Download and extract WordPress
cd /var/www/html
wget https://wordpress.org/latest.zip
unzip latest.zip
mv wordpress/* .
rm latest.zip
rmdir wordpress

# Create configuration file
cp wp-config-sample.php wp-config.php
nano wp-config.php
In the nano editor, edit the wp-config.php file and fill in the database information you created:
define( 'DB_NAME',     'wordpressdb' );
define( 'DB_USER',     'wordpressuser' );
define( 'DB_PASSWORD', 'SuaSenhaForte@2024' );
define( 'DB_HOST',     'localhost' );
define( 'DB_CHARSET',  'utf8mb4' );
Save and exit: Ctrl+O → Enter → Ctrl+X.
Adjust the permissions for WordPress to work correctly:
cd /var/www/html

# Add current user to www-data group
sudo usermod -aG www-data seu_usuario
newgrp www-data

# Set file owner
chown -R www-data:www-data .

# Correct permissions: 775 for directories, 664 for files
find . -type d -exec chmod 775 {} \;
find . -type f -exec chmod 664 {} \;

# Remove default Apache index
rm -f index.html
Result: WordPress is installed and ready to be configured by accessing the public IP (or domain) of your VM in the browser.
Managing Costs and the VM on Azure
How much does it cost to keep the VM?
After the USD 200 free credits expire (or the 30 days), you start paying for actual usage. The prices below are approximate for the Brazil South region (may vary slightly):
Standard_B1ms(1 vCPU, 2 GB RAM): ~USD 15/month if left on 24/7Standard_B2s(2 vCPU, 4 GB RAM): ~USD 35/month if left on 24/7- Premium SSD Disk 30 GB: ~USD 5/month, charged even when the VM is off
- Static public IP: charged only while the VM is off (~USD 0.004/hour)
For testing and learning purposes, the B1ms is more than enough. For production with real traffic, consider at least a B2s. Consult the Azure Pricing Calculator to simulate costs for your exact scenario.
How to shut down and pause the VM (and save money)
For test environments that you only use during the day or at specific times, shutting down the VM when not in use can reduce computing costs by up to 70%.
Attention: shutting down via OS is not enough
If you run shutdown -h now inside the VM or close PuTTY, the VM enters a "Stopped" state, but Azure continues to charge for CPU and RAM. To stop computing charges, you must deallocate the VM via the Azure portal.
To shut down and deallocate the VM correctly (stopping CPU/RAM charges):
- In the Azure portal, access your VM.
- Click the "Stop" button in the top bar.
- Confirm the action. The status should change to "Stopped (deallocated)", which is the correct state.
To turn it on again:
- In the Azure portal, access your VM.
- Click "Start".
- Wait 1-2 minutes. The VM will be ready when the status changes to "Running".
Automation tip: Azure allows you to schedule automatic VM shutdown. On the VM page, look for "Auto-shutdown" in the side menu and configure the time that makes sense for you (e.g., midnight every day). Great for not forgetting the VM on!
Sending Files with FileZilla (SFTP)
With the server configured, you will need to send files to it — your application code, images, templates, or any other content. FileZilla is a free SFTP client with a graphical interface, perfect for this without needing to use the command line.
SFTP ≠ FTP: Always use SFTP (SSH File Transfer Protocol), never simple FTP. SFTP uses the same SSH channel to transfer files with full encryption. Classic FTP transmits everything in plain text — including your password — and should not be used on production servers.
Installing FileZilla
- Access filezilla-project.org and download the FileZilla Client (not the Server).
- Run the installer and follow the standard steps (Next → I Agree → Next → Install).
Connecting to the server via SFTP
Open FileZilla. In the quick connect bar at the top of the window, fill in the fields:
- Host:
sftp://VM_PUBLIC_IP— thesftp://prefix is required to indicate that we want SFTP, not FTP. - Username: the user you created on Azure.
- Password: the password defined during VM creation.
- Port:
22
Click "Quickconnect".
On the first connection, FileZilla displays a window asking if you trust the server key — click "OK" (or check "Always trust this host" to avoid seeing this warning again).
Connected! The screen is divided into two panels: the left panel shows your computer's files and the right panel shows the VM's files. To send a file or folder, drag it from the left panel to the right — or right-click on it and choose "Upload".
Where to put site files
Your site files should go in /var/www/html/. To navigate to this folder in FileZilla, click the "Remote site" field (right panel, top), type /var/www/html and press Enter.
If FileZilla shows a permission error when trying to create or send files in /var/www/html/, run the commands below in the SSH terminal (replacing your_user with your actual username):
chown -R seu_usuario:www-data /var/www/html
chmod -R 775 /var/www/html
This step was already covered in the permissions section, but it is worth checking if you still encounter errors.
Tip: Saving the connection for future use
To avoid typing the IP and password every time, save the connection in the Site Manager:
- Go to File → Site Manager (or press Ctrl+S).
- Click "New site" and give it a name (e.g.,
vm-azure). - Under Protocol, select "SFTP — SSH File Transfer Protocol".
- Fill in Host (just the IP, no
sftp://here), User, and Password. - Click "Connect". The connection will be saved for one-click access next time.
Pointing a domain to the VM
With the server configured and the static IP set, it's time to use a real domain instead of the IP. Here is the complete workflow:
Registering a domain
For .com.br domains, registration is done via Registro.br (the official authority in Brazil):
- Access registro.br, create an account, and check the availability of your desired domain.
- The cost is R$ 40/year (~US$ 7/year) for
.com.brdomains. - After payment, the domain becomes active within 24 hours (usually in minutes).
For international domains (.com, .net, .io, etc.), use registrars like Namecheap or GoDaddy.
Pointing DNS to the VM via Cloudflare
The most practical way is to use Cloudflare as DNS (free), which we will configure in detail in the next section. The workflow is:
- Create a free account on Cloudflare and add your domain.
- Cloudflare will provide you with 2 nameservers (e.g.,
ava.ns.cloudflare.comandbob.ns.cloudflare.com). - In the Registro.br panel, go to your domain → DNS → replace the default nameservers with the ones from Cloudflare.
- Back in Cloudflare, add an A-type DNS record:
- Name:
@(represents the root domain, e.g.,yourdomain.com.br) - Content (IPv4): the static IP of your VM in Azure
- Proxy: enable the orange icon, which enables Cloudflare's CDN and DDoS protection
- Name:
- Also add a CNAME record:
- Name:
www - Target:
@(or the root domain name) - Proxy: enabled
- Name:
Nameserver propagation can take from a few minutes up to 48 hours, but it usually happens in less than 1 hour. To check if it has propagated, use the site dnschecker.org and verify if the A records are pointing to the correct IP in various regions around the world.
Optimizing with Cloudflare
Now that your server is live, let's add a touch of magic to make it faster and more secure with Cloudflare. Cloudflare acts as a CDN (Content Delivery Network), firewall, and performance optimizer, all for free on their basic plans.
How it works and how to apply it
- Create a Cloudflare account: Go to cloudflare.com and add your domain.
- Change Nameservers: Cloudflare will instruct you to change your domain's nameservers to theirs. This is fundamental — all your site traffic will now be routed through Cloudflare.
- DNS Configuration: Cloudflare will automatically import your existing DNS entries. Ensure that the
Arecord for your main domain and thewwwsubdomain points to the public IP of your VM in Azure.
With Cloudflare active, your site already benefits from basic DDoS protection and automatic caching for static assets (CSS, JS, images).
Cache Rules for HTML Pages
For an even greater performance boost, we can configure Cloudflare to cache HTML pages. This is great for sites with content that doesn't change frequently (blogs, institutional sites) and can drastically reduce loading times.
Follow these steps to create a Cache Rule:
- In the Cloudflare dashboard, select your domain.
- Go to the "Rules" section and then to "Cache Rules".
- Click "Create rule".
- In the condition field, define the URL pattern you want to cache. For example:
yourdomain.com.br/*(to cache everything) oryourdomain.com.br/blog/*(only the blog section). - Under "Cache status", select "Eligible for cache".
- Under "Edge TTL", set a lifetime for the cache (e.g., 1 hour, 4 hours, 1 day). This means Cloudflare will serve the cached page for that period before fetching a new version from your server.
- Click "Deploy".
Result: With this rule, Cloudflare will store a copy of your HTML pages on its edge servers. When a user requests a page, if it is in the cache and within the TTL, Cloudflare will deliver it instantly — without even touching your VM in Azure. This means a much faster site with less load on the server!
ATTENTION: Be very careful when applying full-page caching on sites with dynamic content, login areas, or shopping carts. This can cause serious issues, such as users viewing other users' information. Use this rule only on static pages or sections that you are sure can be cached equally for all visitors!
Complete Script
To make it easier, here is the complete script with all the commands we used to configure the environment:
#!/bin/bash
# ================================================================
# Setup script: Debian 12 (Bookworm) + Apache + PHP 8.5
#                         + OPcache + SQL Server ODBC drivers
# ================================================================

## Elevate privileges to root ##
sudo su

## Update repositories ##
apt-get update

## Install Apache and dependencies ##
apt-get --yes install build-essential autoconf flex bison
apt-get --yes install apache2 apache2-dev libapache2-mod-evasive apache2-utils
apt-get --yes install libpng-dev zlib1g zlib1g-dev libxml2 libxml2-dev
apt-get --yes install openssl libssl-dev libgd-dev
apt-get --yes install vim curl libcurl4 libcurl4-openssl-dev
apt-get --yes install libfreetype6-dev libreadline-dev sqlite3
apt-get --yes install rpl zip libzip-dev libbz2-dev unzip libldap2-dev pwgen
apt-get --yes install unixodbc unixodbc-dev s3cmd

## Enable htaccess ##
rpl -e "\n\tOptions Indexes FollowSymLinks\n\tAllowOverride None" \
       "\n\tOptions FollowSymLinks\n\tAllowOverride All" \
       /etc/apache2/apache2.conf

echo "LimitRequestLine 100000" >> /etc/apache2/apache2.conf

## Enable Apache modules ##
a2dismod mpm_event
a2dismod mpm_worker
a2enmod mpm_prefork
a2enmod rewrite
a2enmod headers

## Add PHP repository (Ondřej Surý) ##
apt install apt-transport-https lsb-release ca-certificates curl gnupg -y

curl -sSLo /usr/share/keyrings/deb.sury.org-php.gpg https://packages.sury.org/php/apt.gpg
echo "deb [signed-by=/usr/share/keyrings/deb.sury.org-php.gpg] https://packages.sury.org/php/ $(lsb_release -sc) main" \
    | tee /etc/apt/sources.list.d/php.list

apt update

## Install PHP 8.5 ##
apt install php8.5 php8.5-cli php8.5-{bz2,curl,mbstring,intl,xml,gd,zip,mysql,opcache,readline} -y
apt install php-pear wget git php-cgi php-common php-net-socket -y

## Configure OPcache ##
cat > /etc/php/8.5/mods-available/opcache.ini << 'EOF'
zend_extension=opcache.so
opcache.enable=1
opcache.memory_consumption=256
opcache.interned_strings_buffer=16
opcache.max_accelerated_files=10000
opcache.revalidate_freq=60
opcache.fast_shutdown=1
opcache.enable_cli=0
EOF

## Install mod_php for Apache ##
apt install libapache2-mod-php8.5 -y
a2enmod php8.5

## Add Microsoft repository (ODBC — Debian) ##
curl -fsSL https://packages.microsoft.com/keys/microsoft.asc \
    | gpg --dearmor -o /usr/share/keyrings/microsoft-prod.gpg

curl -s https://packages.microsoft.com/config/debian/12/prod.list \
    | tee /etc/apt/sources.list.d/mssql-release.list

apt-get update

## Install SQL Server ODBC drivers ##
ACCEPT_EULA=Y apt-get -y install msodbcsql18 mssql-tools18

echo 'export PATH="$PATH:/opt/mssql-tools18/bin"' >> ~/.bashrc
source ~/.bashrc

## Install PHP extensions for SQL Server via PECL ##
apt install php8.5-dev php8.5-xml -y
export PHP_PEAR_PHP_BIN=/usr/bin/php8.5
pecl channel-update pecl.php.net
pecl install sqlsrv
pecl install pdo_sqlsrv

## Enable extensions in PHP ##
echo "extension=sqlsrv.so"     > /etc/php/8.5/mods-available/sqlsrv.ini
echo "extension=pdo_sqlsrv.so" > /etc/php/8.5/mods-available/pdo_sqlsrv.ini
phpenmod -v 8.5 sqlsrv pdo_sqlsrv


## Final permissions and updates ##
# Replace 'seu_usuario' with your actual user
usermod -a -G www-data seu_usuario
newgrp www-data

apt-get upgrade -y
apt autoremove -y
apt-get install htop ncdu -y

## Configure UFW ##
apt-get install ufw -y
ufw default deny incoming
ufw default allow outgoing
ufw allow ssh
ufw allow http
ufw allow https
ufw --force enable

## Restart Apache ##
systemctl restart apache2

# Install Certbot for Apache
apt install certbot python3-certbot-apache -y

# Obtain certificate (replace with your actual domain)
certbot --apache -d seudominio.com.br -d www.seudominio.com.br

cd /var/www/html

# Add current user to www-data group
sudo usermod -aG www-data seu_usuario
newgrp www-data

# Set file owner
chown -R www-data:www-data .

# Correct permissions: 775 for directories, 664 for files
find . -type d -exec chmod 775 {} \;
find . -type f -exec chmod 664 {} \;

echo ""
echo "======================================================"
echo " Configuração concluída com sucesso!"
echo " PHP $(php -r 'echo PHP_VERSION;') instalado com drivers SQL Server."
echo " OPcache ativo. UFW configurado."
echo "======================================================"
And that's it, folks!
I hope you enjoyed this post. Best regards and see you next time!

Comments (0)
Loading comments...