
Hey guys!
In this article, I want to explain to you exactly what the message “String or binary data would be truncated” means, how we can identify which string is causing the error, how to hide this error message (if you want), what the change in sys.messages has impacted on this topic from SQL Server 2016+ and much more!
So if you have difficulty identifying and correcting occurrences of this error message, today will be the last time this will still be a problem for you.
What is “String or binary data would be truncated”
One of the most common SQL Server errors, the message “String or binary data would be truncated” occurs when a value is trying to be inserted or updated in a table and it is greater than the maximum field size.
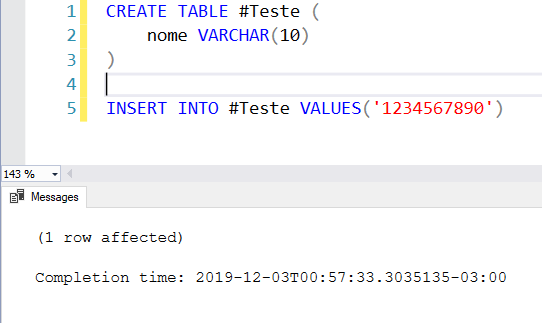
Example 1 – Maximum field size of 10 characters, string of 10:
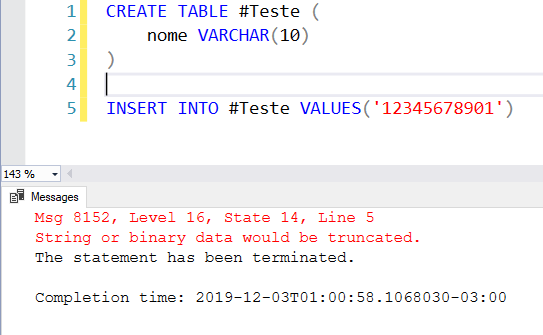
Example 2 – Maximum field size of 10 characters, string of 11:
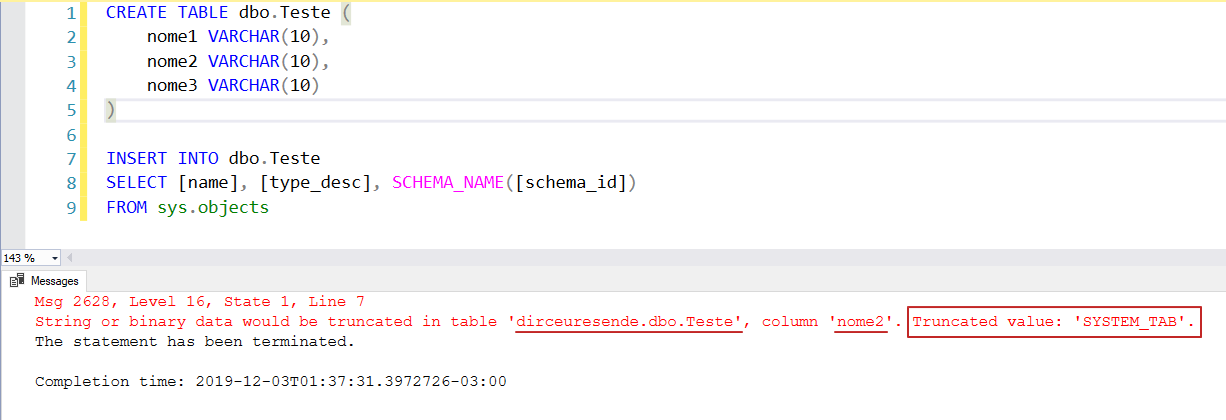
Example 3 – Difficult to identify the error
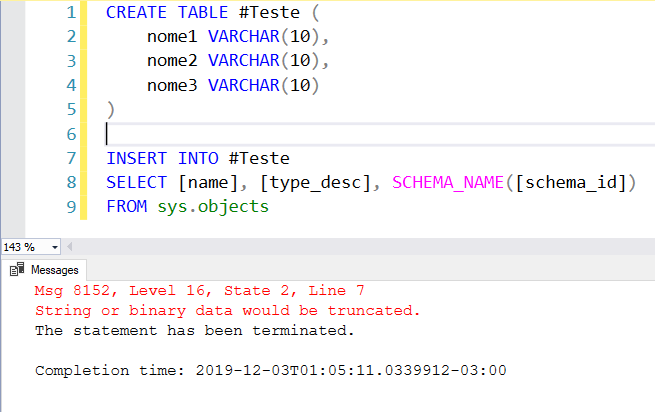
Look at example 3. I am no longer inserting a fixed value, but from another table. This type of situation may seem simple in a scenario like examples 1 and 2, but when you are inserting several records, especially taking data from several columns, it is difficult to identify which record and which column is causing this error message and this task can end up taking more time than you would like.
How to bypass string truncation
If you want to ignore string truncation at a given time or operation, you have the option of doing so in SQL Server, as already demonstrated in the article SQL Server – Why NOT use SET ANSI_WARNINGS OFF. I do not recommend using this technique in any way, as it is a solution that is only masking the problem and not correcting it, but I would like to show that it exists and that it is possible to do it.
When you use the SET ANSI_WARNINGS OFF command, you prevent the SQL Server engine from generating this error during execution, causing your 14-character text to be truncated and stored in the 10-character column. Excess characters will be silently discarded, ignoring and masking a problem in recording data on your system, without anyone knowing.
Example:
SET NOCOUNT ON
SET ANSI_WARNINGS OFF

IF ((@@OPTIONS & 8) > 0) PRINT 'SET ANSI_WARNINGS is ON'

IF (OBJECT_ID('tempdb..#Teste') IS NOT NULL) DROP TABLE #Teste
CREATE TABLE #Teste ( Nome VARCHAR(10) )

INSERT INTO #Teste
VALUES ('Dirceu Resende') -- 14 caracteres

SELECT * FROM #Teste
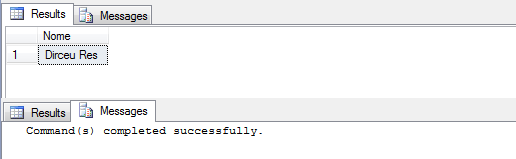
Return with SET ANSI_WARNINGS ON (Default):

Return with SET ANSI_WARNINGS OFF:
String or binary data would be truncated in SQL Server 2019
SQL Server 2019 was released on November 4, 2019, during Microsoft Ignite, and with it, a huge range of new features were officially launched.
One of these new features are the new messages available in sys.messages, which I had already shared with you in my article SQL Server 2019 – List of new features and features since the end of August 2018:

With this change, it is now much easier to identify exactly where the truncation of values is occurring:
In other words, this new behavior will only work automatically in SQL Server 2019, if the connection database is in compatibility mode 150 onwards.
What changed starting with SQL Server 2016+
With the changes necessary for this implementation in SQL Server 2019, Microsoft ended up releasing this new message also in versions 2016 (starting with SP2 Cumulative Update 6) and 2017 (starting with Cumulative Update 12). And to be able to use this new message, we can use 2 different ways:
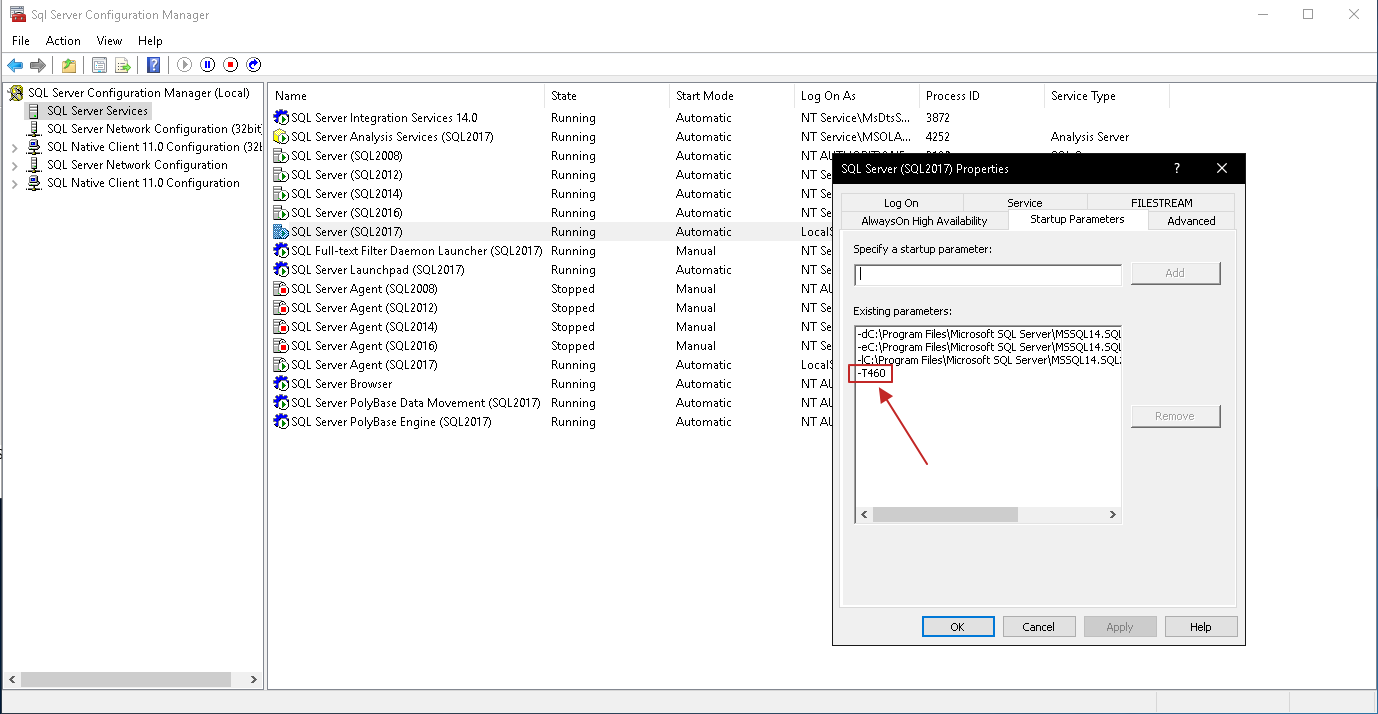
Way 1: Using initialization parameter -T460
The first and most practical way is to enable traceflag 460 across the entire instance using the -T460 initialization parameter in the SQL Server service:
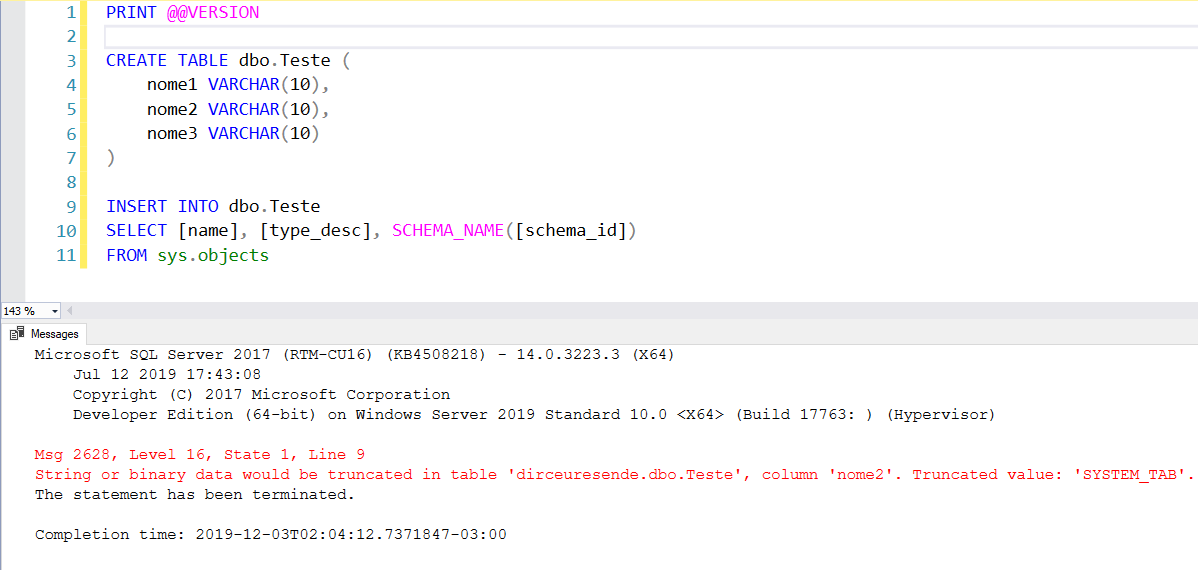
Once added, it will be necessary to restart the service and from then on, the new message will be working by default, without having to make any changes to the query:
Way 2: Using traceflag 460
A way that does not require restarting the SQL Server service and also does not require changing code is by using the DBCC TRACEON command, which allows you to activate this traceflag at the session level and at the instance level (global):
Session level (only affects your session):
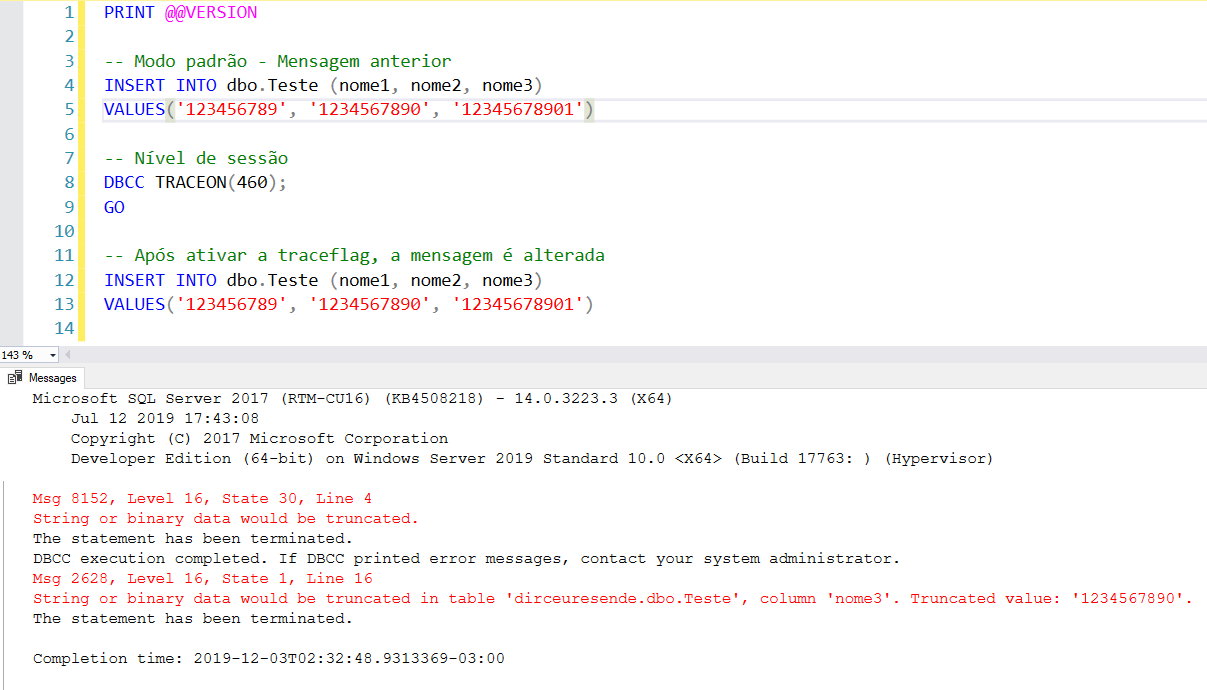
Instance level (global – affects all sessions):
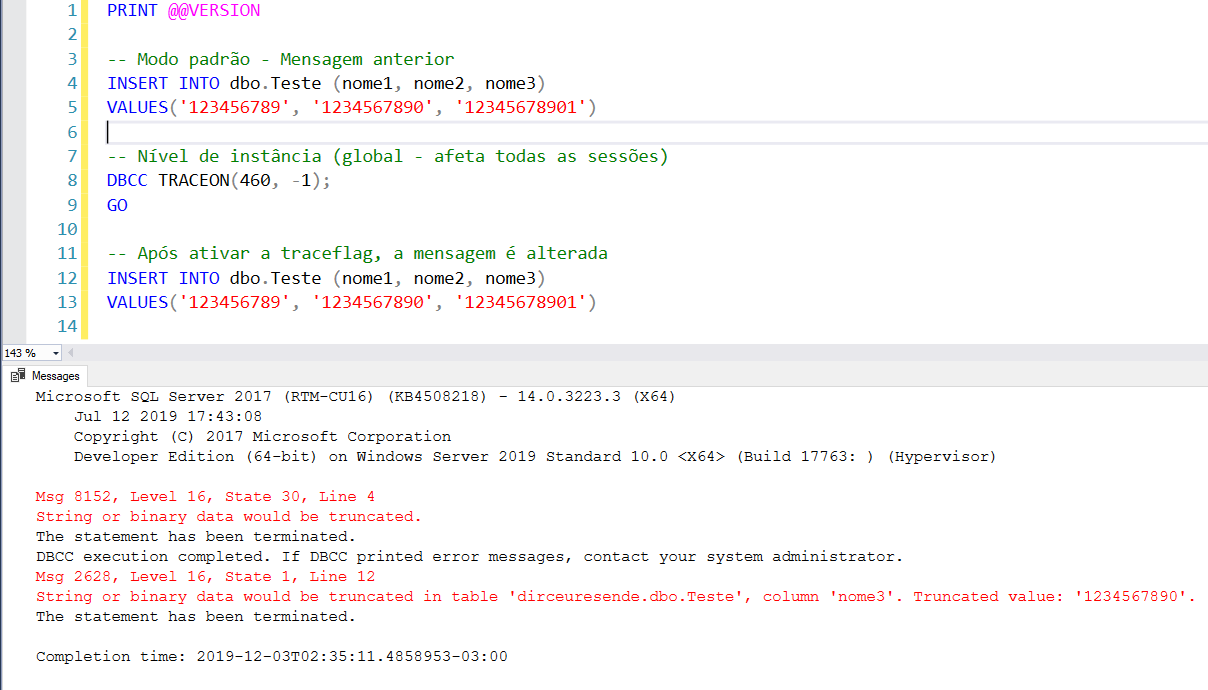
Script used:
PRINT @@VERSION

CREATE TABLE dbo.Teste (
    nome1 VARCHAR(10),
    nome2 VARCHAR(10),
    nome3 VARCHAR(10)
)

-- Modo padrão - Mensagem anterior
INSERT INTO dbo.Teste (nome1, nome2, nome3)
VALUES('123456789', '1234567890', '12345678901')

-- Nível de instância (global - afeta todas as sessões)
DBCC TRACEON(460, -1);
GO

-- Nível de sessão (afeta apenas a sua sessão)
DBCC TRACEON(460);
GO

-- Após ativar a traceflag, a mensagem é alterada
INSERT INTO dbo.Teste (nome1, nome2, nome3)
VALUES('123456789', '1234567890', '12345678901')Identifying string truncation before SQL Server 2016
If you are using a version prior to 2016 and have difficulty identifying which values are exceeding the limit of a column, I will share a simple script that can identify this type of error even in older versions of SQL Server, creating a “clone” table of the original, with the size of the columns set to maximum, inserting the data into this new table and comparing the size used by the size of the columns in the original table.
Example of a situation where the script can be used:
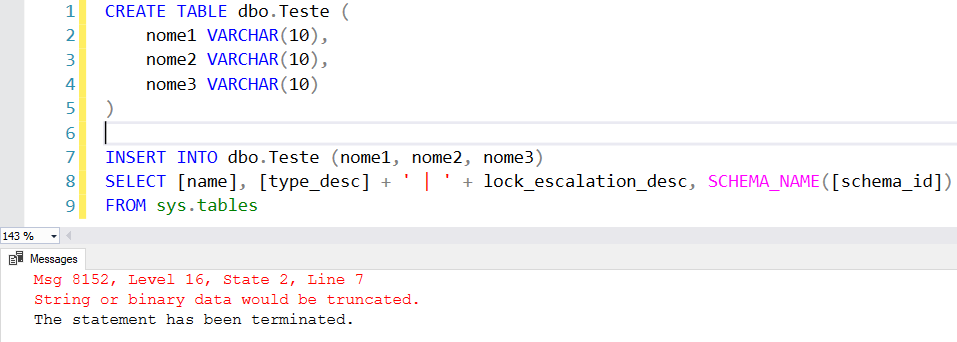
I tried to execute my INSERT command and it gave an error in some value, in some column, which I don't know what it is. Now is the time when you think about the work it will take to identify this, especially if you have about 100 columns instead of just these 3 in the example... Having to insert the data into a “clone” table and querying and comparing the largest size of each column... It seems laborious...
To make this column identification work easier, I will share with you the script below, which does this identification for you. Remember to change the name of the source table and the INSERT/UPDATE script in the cloned table with your original script.
DECLARE @Nome_Tabela VARCHAR(255) = 'Teste'

-- Crio uma tabela com a mesma estrutura
IF (OBJECT_ID('tempdb..#Tabela_Clonada') IS NOT NULL) DROP TABLE #Tabela_Clonada
SELECT *
INTO
    #Tabela_Clonada
FROM
    dbo.Teste -- Tabela original (LEMBRE-SE DE ALTERAR AQUI TAMBÉM)
WHERE
    1=2 -- Não quero copiar os dados


-- Agora, vou alterar todas as colunas varchar/char/nvarchar/nchar para varchar(max)
DECLARE @Query VARCHAR(MAX) = ''

SELECT
    @Query += 'ALTER TABLE #Tabela_Clonada ALTER COLUMN [' + B.[name] + '] ' + UPPER(C.[name]) + '(MAX); '
FROM
    sys.tables A
    JOIN sys.columns B ON B.[object_id] = A.[object_id]
    JOIN sys.types C ON B.system_type_id = C.system_type_id
WHERE
    A.[name] = @Nome_Tabela
    AND B.system_type_id IN (167, 175, 231, 239) -- varchar/char/nvarchar/nchar
    AND B.max_length > 0


EXEC(@Query)


------------------------------------------------------------------------------------------------------------------
-- Faço a inserção dos dados que estão apresentando erro na tabela temporária (LEMBRE-SE DE ALTERAR AQUI TAMBÉM)
------------------------------------------------------------------------------------------------------------------

INSERT INTO #Tabela_Clonada
-- Alterar esse SELECT aqui pelo seu
SELECT [name], [type_desc] + ' | ' + lock_escalation_desc, SCHEMA_NAME([schema_id])
FROM sys.tables


-- Crio uma tabela temporária com o tamanho máximo de caracteres de cada coluna
SET @Query = ''

SELECT
    @Query = @Query + 'SELECT ' + QUOTENAME(A.[name], '''') + ' AS coluna, ' + QUOTENAME(B.[name], '''') + ' AS tipo, MAX(DATALENGTH(' + QUOTENAME(A.[name]) + ')) AS tamanho FROM #Tabela_Clonada UNION '
FROM
    tempdb.sys.columns A
    JOIN sys.types B on B.system_type_id = A.system_type_id and B.[name] <> 'sysname'
WHERE
    A.[object_id] = OBJECT_ID('tempdb..#Tabela_Clonada')
    AND B.system_type_id IN (167, 175, 231, 239) -- varchar/char/nvarchar/nchar


SET @Query = LEFT(@Query, LEN(@Query)-6)

IF (OBJECT_ID('tempdb..#Tamanho_Maximo_Coluna') IS NOT NULL) DROP TABLE #Tamanho_Maximo_Coluna
CREATE TABLE #Tamanho_Maximo_Coluna (
    coluna VARCHAR(255),
    tipo VARCHAR(255),
    tamanho INT
)

INSERT INTO #Tamanho_Maximo_Coluna
EXEC(@Query)


-- E por fim, faço a comparação dos dados de uma tabela pela outra
SELECT
    B.[name] AS coluna,
    C.[name] AS tipo,
    B.max_length AS tamanho_atual,
    D.tamanho AS tamanho_necessario
FROM
    sys.tables A
    JOIN sys.columns B ON B.[object_id] = A.[object_id]
    JOIN sys.types C ON B.system_type_id = C.system_type_id
    JOIN #Tamanho_Maximo_Coluna D ON B.[name] = D.coluna
WHERE
    A.[name] = @Nome_Tabela
    AND B.system_type_id IN (167, 175, 231, 239) -- varchar/char/nvarchar/nchar
    AND B.max_length < D.tamanho
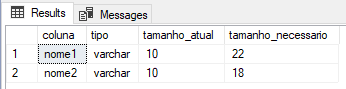
By executing this script, we will have exact feedback on which columns are too small for the data they are receiving and what is the ideal size to be able to store this data.
I hope you enjoyed this article, a big hug and see you in the next post!
Hugs
References:
- SQL Server 2019 – List of new features and features
- SQL Server – Why NOT use SET ANSI_WARNINGS OFF
- How was the SQL Server 2019 News Live on the dotNET Channel?
- https://www.sqlshack.com/sql-truncate-enhancement-silent-data-truncation-in-sql-server-2019/
- https://imasters.com.br/banco-de-dados/adeus-string-binary-data-truncated
- https://www.brentozar.com/archive/2019/03/how-to-fix-the-error-string-or-binary-data-would-be-truncated/

Comments (0)
Loading comments...